Animation
Keyframes and easing
A keyframe holds a property’s value at one moment, and the editor works out every frame in between. This page covers setting and editing keyframes, how a value travels from one keyframe to the next, and the tools that write keyframes for you.
Set keyframes
Every property that can change over time has a stopwatch beside its name, in Properties and in the Timeline. Select it and the property is animated: a keyframe (external website, opens in a new tab) is set at the playhead with the value the property has now. Make your first animation (opens in a new tab) goes through it step by step.
While the stopwatch is on, a change at another time sets a keyframe there, whether you type a number, drag it, or move the layer in the viewer. The diamond at the end of the property’s row adds or removes a keyframe at the playhead without changing the value.
Selecting the stopwatch again removes all of the property’s keyframes and keeps the value it has at the playhead; ⌘Z brings them back. J and K move the playhead to the previous or next keyframe in the Timeline.
Select, move and copy keyframes
You edit keyframes in the Timeline, one property at a time. On Windows, use Ctrl where these keys say ⌘; every key is listed under Edit shortcuts (opens in a new tab).
- Select. Click a keyframe; Shift-click adds or removes one. Drag a box across a property’s keyframes to select them, or select the property and press ⌘A for all of them.
- Move. Drag a keyframe sideways to change when it happens. The keyframe you clicked also moves with the arrow keys: a frame at a time, or ten with Shift.
- Set it exactly. Double-click a keyframe to type its frame, value and interpolation in Edit Keyframe.
- Copy. ⌘C copies the selected keyframes and ⌘X cuts them. Select a property of the same kind on any layer, Position for Position, and press ⌘V: they are pasted from the playhead on, keeping their spacing.
- Delete. Delete removes the selected keyframes.
Right-click a keyframe for everything else you can do with the selected keyframes.
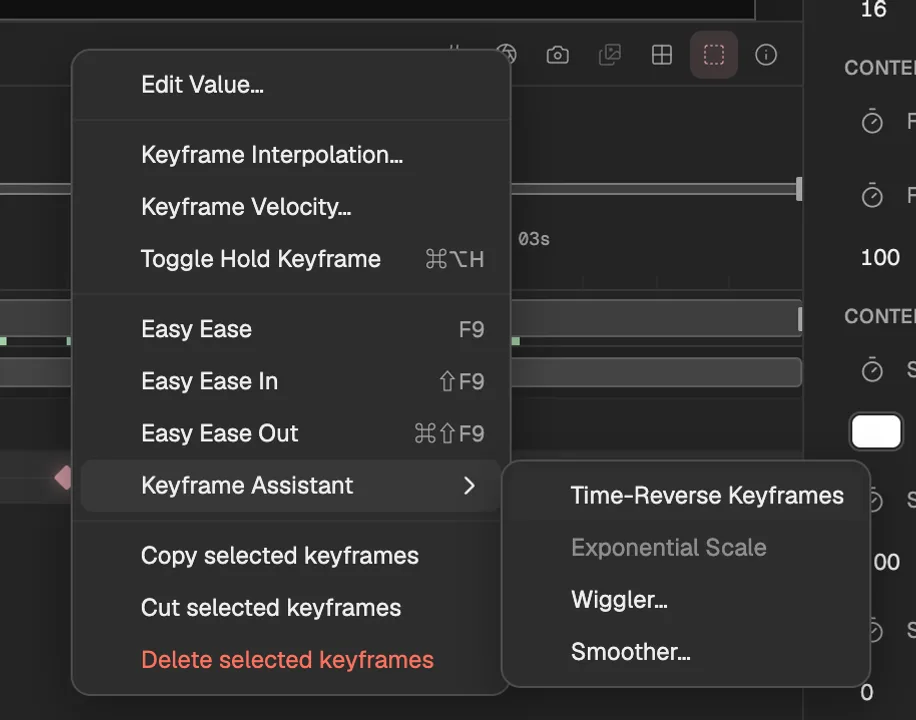
- How the value travels between keyframes.
- Exact speed and influence.
- Easy Ease, and below it Easy Ease In and Easy Ease Out.
- Keyframe assistants that rewrite the selected keyframes.
Interpolation
Interpolation is how a value travels from one keyframe to the next. Each kind has its own shape in the Timeline:
- Linear
- A diamond. An even speed from one keyframe to the next. New keyframes are linear.
- Bezier
- An hourglass. The value gathers speed or slows down near the keyframe, as its speed and influence set (see Ease in and out); the two sides can differ.
- Continuous Bezier
- Also an hourglass: Bezier with one speed on both sides, so the motion passes through the keyframe without a jolt.
- Auto Bezier
- A circle. A smooth pass through the keyframe that the editor works out from the keyframes either side, and works out again when they change.
- Hold
- A square. The value stays as it is until the next keyframe, then jumps. Values that cannot change gradually, such as a choice from a list, only hold.
Select the keyframes and right-click one of them.
Choose Keyframe Interpolation. Under Temporal Interpolation, pick the kind; Current Settings leaves it as it is. Then select OK.
Or make them hold at once with Toggle Hold Keyframe (⌘⌥H, or Ctrl+Alt+H on Windows). Used again on keyframes that all hold, it makes them linear.
Position also travels through space, along the dotted path the viewer draws, so for Position keyframes the dialog has two more settings. Spatial path is the shape of the path at the keyframe: straight, or curved in one of the Bezier kinds.
In Rove, Rove Across Time lets a keyframe slide in time so that the speed along the path stays even, and Lock To Time pins it again. The first and last keyframes never rove, and dragging a roving keyframe pins it. The same settings are in the Timeline toolbar, under Spatial path options.
Ease in and out
With linear keyframes, a move starts and stops at full speed, which looks mechanical. Easing makes it gather speed as it leaves a keyframe and slow down as it arrives, as real things do.
Select the keyframes to ease.
Press F9 for Easy Ease: the value slows to a stop at each of them. Easy Ease In (⇧F9, or Shift+F9 on Windows) eases only the arrival, and Easy Ease Out (⌘⇧F9, or Ctrl+Shift+F9) only the departure. All three are in the keyframe menu too.
Each side of an eased keyframe has a speed and an influence. Speed is how fast the value changes as it arrives or leaves. Influence is how far that speed reaches towards the neighbouring keyframe, as a share of the time between them: the larger it is, the longer the slow part. Easy Ease sets the speed to 0 and the influence to 33.33%.
To type exact numbers, right-click a keyframe and choose Keyframe Velocity. It shows the first selected keyframe and applies to all of them.
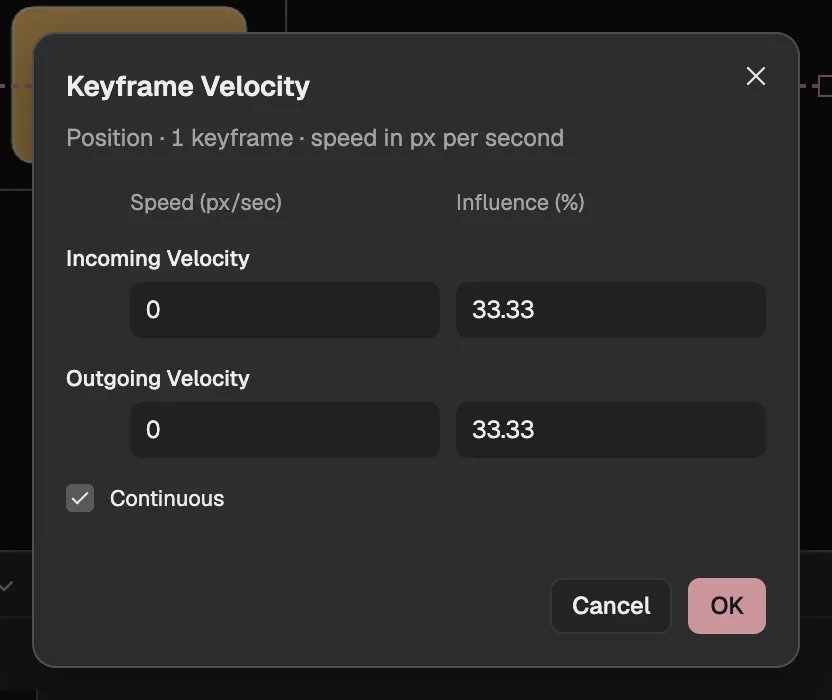
- The speed and influence as the value arrives.
- The speed and influence as it leaves.
- Speed, in the property’s units per second.
- Influence, as a percentage of the time to the neighbouring keyframe.
- Keeps both sides at one speed.
To shape an ease by eye, drag its handles in the Graph Editor (opens in a new tab).
Keyframe assistants
The 6 keyframe assistants write or rewrite keyframes for you, each in one step that ⌘Z undoes. The first four are under Keyframe Assistant in the keyframe menu and work on the selected keyframes.
- Time-Reverse Keyframes plays the selected keyframes backwards over the same stretch of time.
- Exponential Scale, on two Scale keyframes, puts a keyframe on every frame between them, so that a zoom looks even all the way instead of slowing down as it grows.
- Wiggler adds keyframes between the selected ones that wander at random from the values. You set how often, how far, and whether the wandering is smooth or jagged.
- Smoother redraws the selected keyframes with as few keyframes as keep the curve within a tolerance you set.
- Motion Sketch is a button in the bar under the viewer. Switch it on and drag in the viewer: the selected layer’s path is recorded at the speed you move, as Position keyframes from the playhead on.
- Convert to Keyframes, in a property’s expression editor, puts a keyframe on every frame with the value the expression gives there, and turns the expression off without deleting it.
Save animation as a preset
Save. Right-click a layer and choose Save Animation Preset. Name the preset and tick the effects and animated properties it should keep.
Apply. Select a layer, in this project or another one, and put the playhead where the animation should start. In Effects & Presets, under Animation Presets, select Apply beside the preset.
The effects are added and the properties written, their first keyframe at the playhead; properties the layer doesn’t have are left out. Presets are kept in this browser and offered in every project in it. Deleting one leaves the layers it was applied to as they are.