Effects
Using effects
Effects change how a layer looks: blur it, colour it, distort it, key it or generate something new on it. You find them in Effects & Presets and adjust them in Effect Controls, and every setting can be keyframed like any other property.
Find an effect
Effects & Presets is in the right-hand dock. Its effects are grouped in the same categories as in After Effects; open a category to see its effects, with their number beside its name.
Type in Search effects to find an effect by name, and every category with a match opens. With a layer selected, the panel lists only the effects that layer can take; with none selected it lists them all, but you can add one only once a layer is selected.
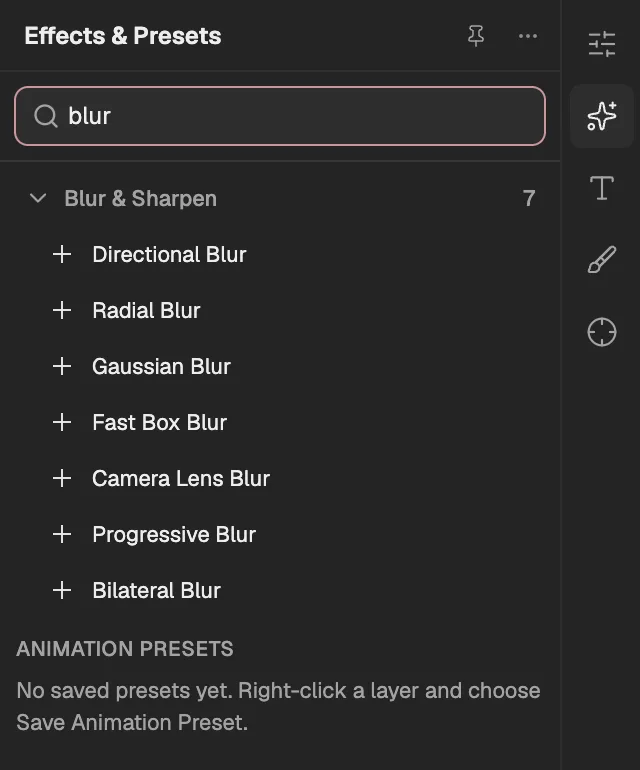
- Search by name, in the editor’s language.
- A category, and how many of its effects the selected layer can take.
- Select an effect to add it to the selected layer.
- Your saved animation presets.
Which effects a layer can take depends on its type:
- Every effect
- Image, Video, Text, Shape, Solid, Composition, and Adjustment
- Expression controls only
- 3D primitive, Null, Camera, Light, Skeleton, and 3D model
- No effects
- Audio
Add an effect to a layer
Select the layer in the Viewer or the Timeline.
Open Effects & Presets from the icon bar of the right-hand dock.
Find the effect by searching, or by opening its category.
Select it. It is added below the layer’s other effects with its default settings, as one step you can undo.
Open Effect Controls, the tab beside Project in the left-hand dock, to adjust it.
- The command palette (⌘K, or Ctrl K on Windows) adds effects too: with a layer selected, it lists the effects that layer can take.
- So does the layer’s right-click menu in the Timeline or the Viewer, under Effects, in the same categories. As in Effects & Presets, an effect that reads another layer (below) starts on the first layer it can use, and stays greyed out when the composition has none.
- When the selected layer has no effects yet, Effect Controls offers a button to Open Effects & Presets.
Adjust effects in Effect Controls
Effect Controls shows the selected layer’s effects from top to bottom, in the order they are applied: each effect works on the result of the one above it.
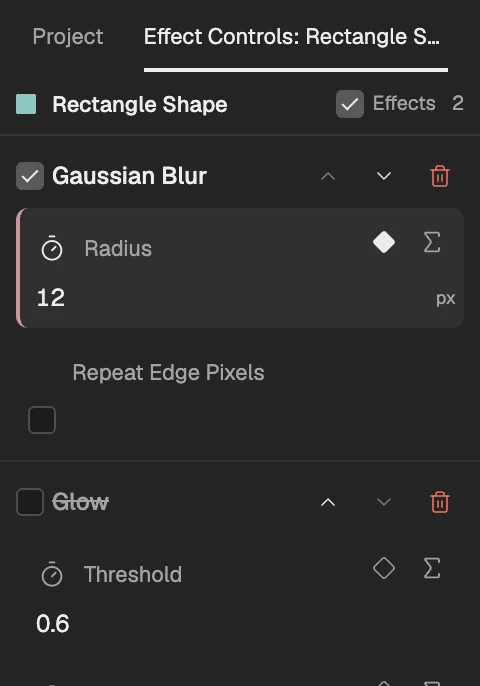
- The tab names the selected layer.
- Turns all of this layer’s effects off or on.
- Turns one effect off or on. An effect that is off is struck through.
- Moves an effect up or down the stack.
- Removes the effect.
- Starts keyframing a setting, as on any property.
- Adjust a setting by typing a value, or by dragging across a number.
- Keyframe it with its stopwatch and keyframe button. Its keyframes appear in the Timeline under the layer’s effects.
- Drive it with an expression from its Σ button: see Expression basics (opens in a new tab).
- Turn off an effect to compare without losing its settings. An effect that is off is not rendered, in the Viewer or in an export.
- Reorder effects with the arrows and remove one with the bin. Each change is one step, so Undo takes it back.
- There is no command to duplicate an effect: add the same effect again, or save the layer’s effects as a preset (below) and apply it to another layer.
Effects that read another layer
A few effects use a second layer of the same composition, such as a map to displace by or a matte to cut with. Its menu is at the top of the effect in Effect Controls and lists the composition’s other layers that it can read.
A layer the effect needs is chosen for you when you add it: the first suitable layer in the composition. When there is none, the effect cannot be added until there is. An optional one starts at None.
| Effect | Reads |
|---|---|
| Displacement Map (opens in a new tab) | Map Layer |
| Set Matte (opens in a new tab) | Take Matte From Layer |
| Time Displacement (opens in a new tab) | Time Displacement Layer (optional) |
| Particle World (opens in a new tab) | Texture Layer (optional) |
| Caustics (opens in a new tab) | Water Surface (optional) |
Adjustment layers
An adjustment layer has no picture of its own: its effects apply to everything below it in the composition. Use one to grade or blur several layers at once.
Add the layer from New layer › Adjustment.
Move it above the layers it should change. Layers above it are left alone.
Add effects to it as to any other layer.
- Its opacity sets how strongly its effects show, and its masks, track matte and blend mode limit where and how they apply.
Time effects do not work on an adjustment layer, because it has no frames of its own to read. There, Problems reports them, the Viewer leaves them out, and exporting is blocked until they are removed. The time effects are Posterize Time (opens in a new tab), Echo (opens in a new tab), Time Displacement (opens in a new tab), and Timewarp (opens in a new tab).
Animation and effect presets
A preset keeps a layer’s effects and animated properties, so you can apply them to other layers, in this project or any other. Presets are kept in this browser, not in the project.
Right-click the layer in the Timeline and choose Save Animation Preset.
Name it and choose what it keeps under Include: each effect and each animated property.
Select Save Preset. It appears under Animation Presets in Effects & Presets.
To use it, select a layer and choose Apply beside the preset. Its animation starts at the current time.
- The bin beside a preset removes it from this browser. Layers it was applied to keep their effects and animation.
- Another browser or device does not have your presets, and clearing this site’s data removes them. To keep your work, back up the project instead: see Saving and backup (opens in a new tab).
Effect reference
Every effect, with its settings, their defaults and their ranges, is in the effect reference, one page per category: