Projects and assets
Importing
Keyframe imports pictures, video, sound, 3D models and fonts. Layered artwork, a picture split into parts with one image per part, comes in as a folder and turns into layers you can animate.
Before you import
The pictures can come from anywhere: your drawing app, or an image AI such as ChatGPT that gives you a folder of images. Keyframe needs no special files or settings, only the pictures. If all you have is one flat picture, separate it into layers (opens in a new tab) instead.
- Same canvas for every part. Draw each part where it belongs on a canvas of the same size, with a transparent background. Stacked up, the parts then line up by themselves.
- Name the files front to back. For example 01 arm.png, 02 head.png, 03 body.png. Keyframe proposes the order of the names; you can change it before importing.
- Keep the whole picture apart. A picture of the complete artwork is handy to compare with. Put it in a folder called reference and Keyframe suggests leaving it out of the layers.
- What it takes. PNG, JPEG, WebP and SVG pictures (video, audio and 3D model files too), up to 64 files at a time and 20 MB per picture. ZIP files are not opened: unzip them first.
Import a folder
Open the composition. Layers go into the composition shown in the viewer; in a new project that is Main. If the composition is still empty, you can also start from one picture: New composition from asset makes a composition the size of that picture.
Drag the folder onto Upload file. It is the arrow at the foot of the Project panel. Keyframe looks through the folder and every folder inside it. Selecting the button instead lets you pick single files.
Check the list. The review window (Review 5 assets for a folder of five files) shows every file with the folder it came from and what Keyframe proposes: Layer, or Reference suggestion for a file in a reference folder. Untick anything you don’t want.
Fix the order. The list runs from front to back: the first file becomes the top layer. Move a file with its up and down arrows.
Import. Select the import button at the foot of the review. It counts the ticked files, so with four ticked it reads Import 4. Every ticked file becomes a layer in the composition, in one step that ⌘Z undoes.
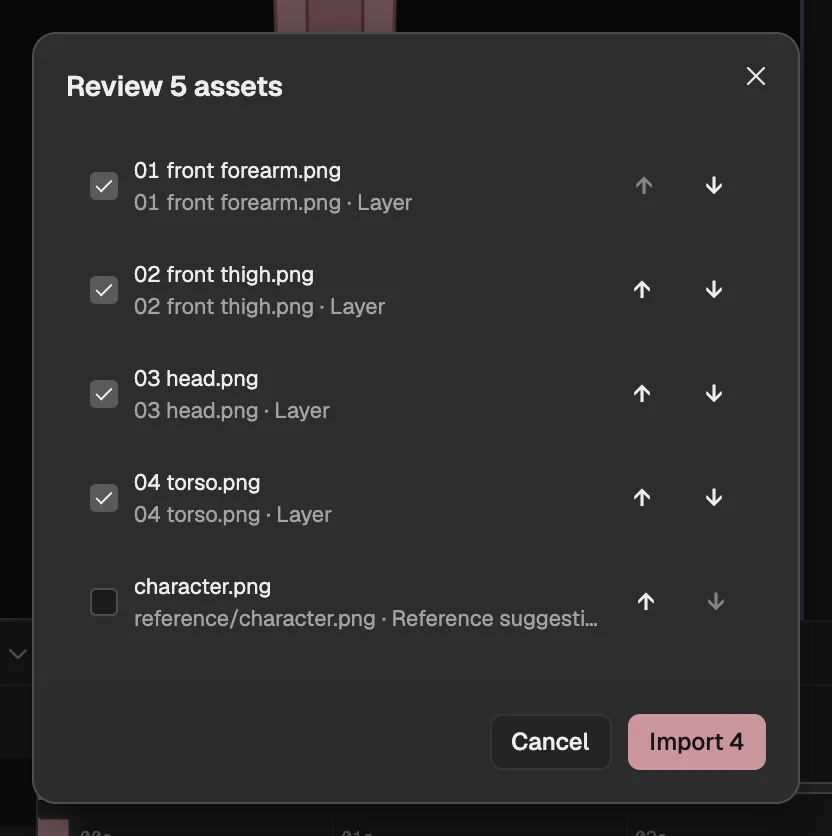
- How many files Keyframe found.
- Ticked files become layers.
- Moves a file nearer the front or the back.
- A picture in a reference folder starts unticked.
- Imports the ticked files.
Each layer starts in the middle of the composition at its own size, so parts drawn on canvases of the same size line up straight away. Move or scale them afterwards in Properties. To pose a character made of parts, build it a skeleton (opens in a new tab).
Add finer parts to a layer later
Sometimes one layer needs splitting further: an arm into upper arm, forearm and hand. Make the parts in your drawing app or image AI on a canvas exactly the size of that layer’s picture, then:
Select the layer in the Timeline.
Open Layer Settings in the Properties panel and select Import children. Choose the folder of parts.
Review and import as above.
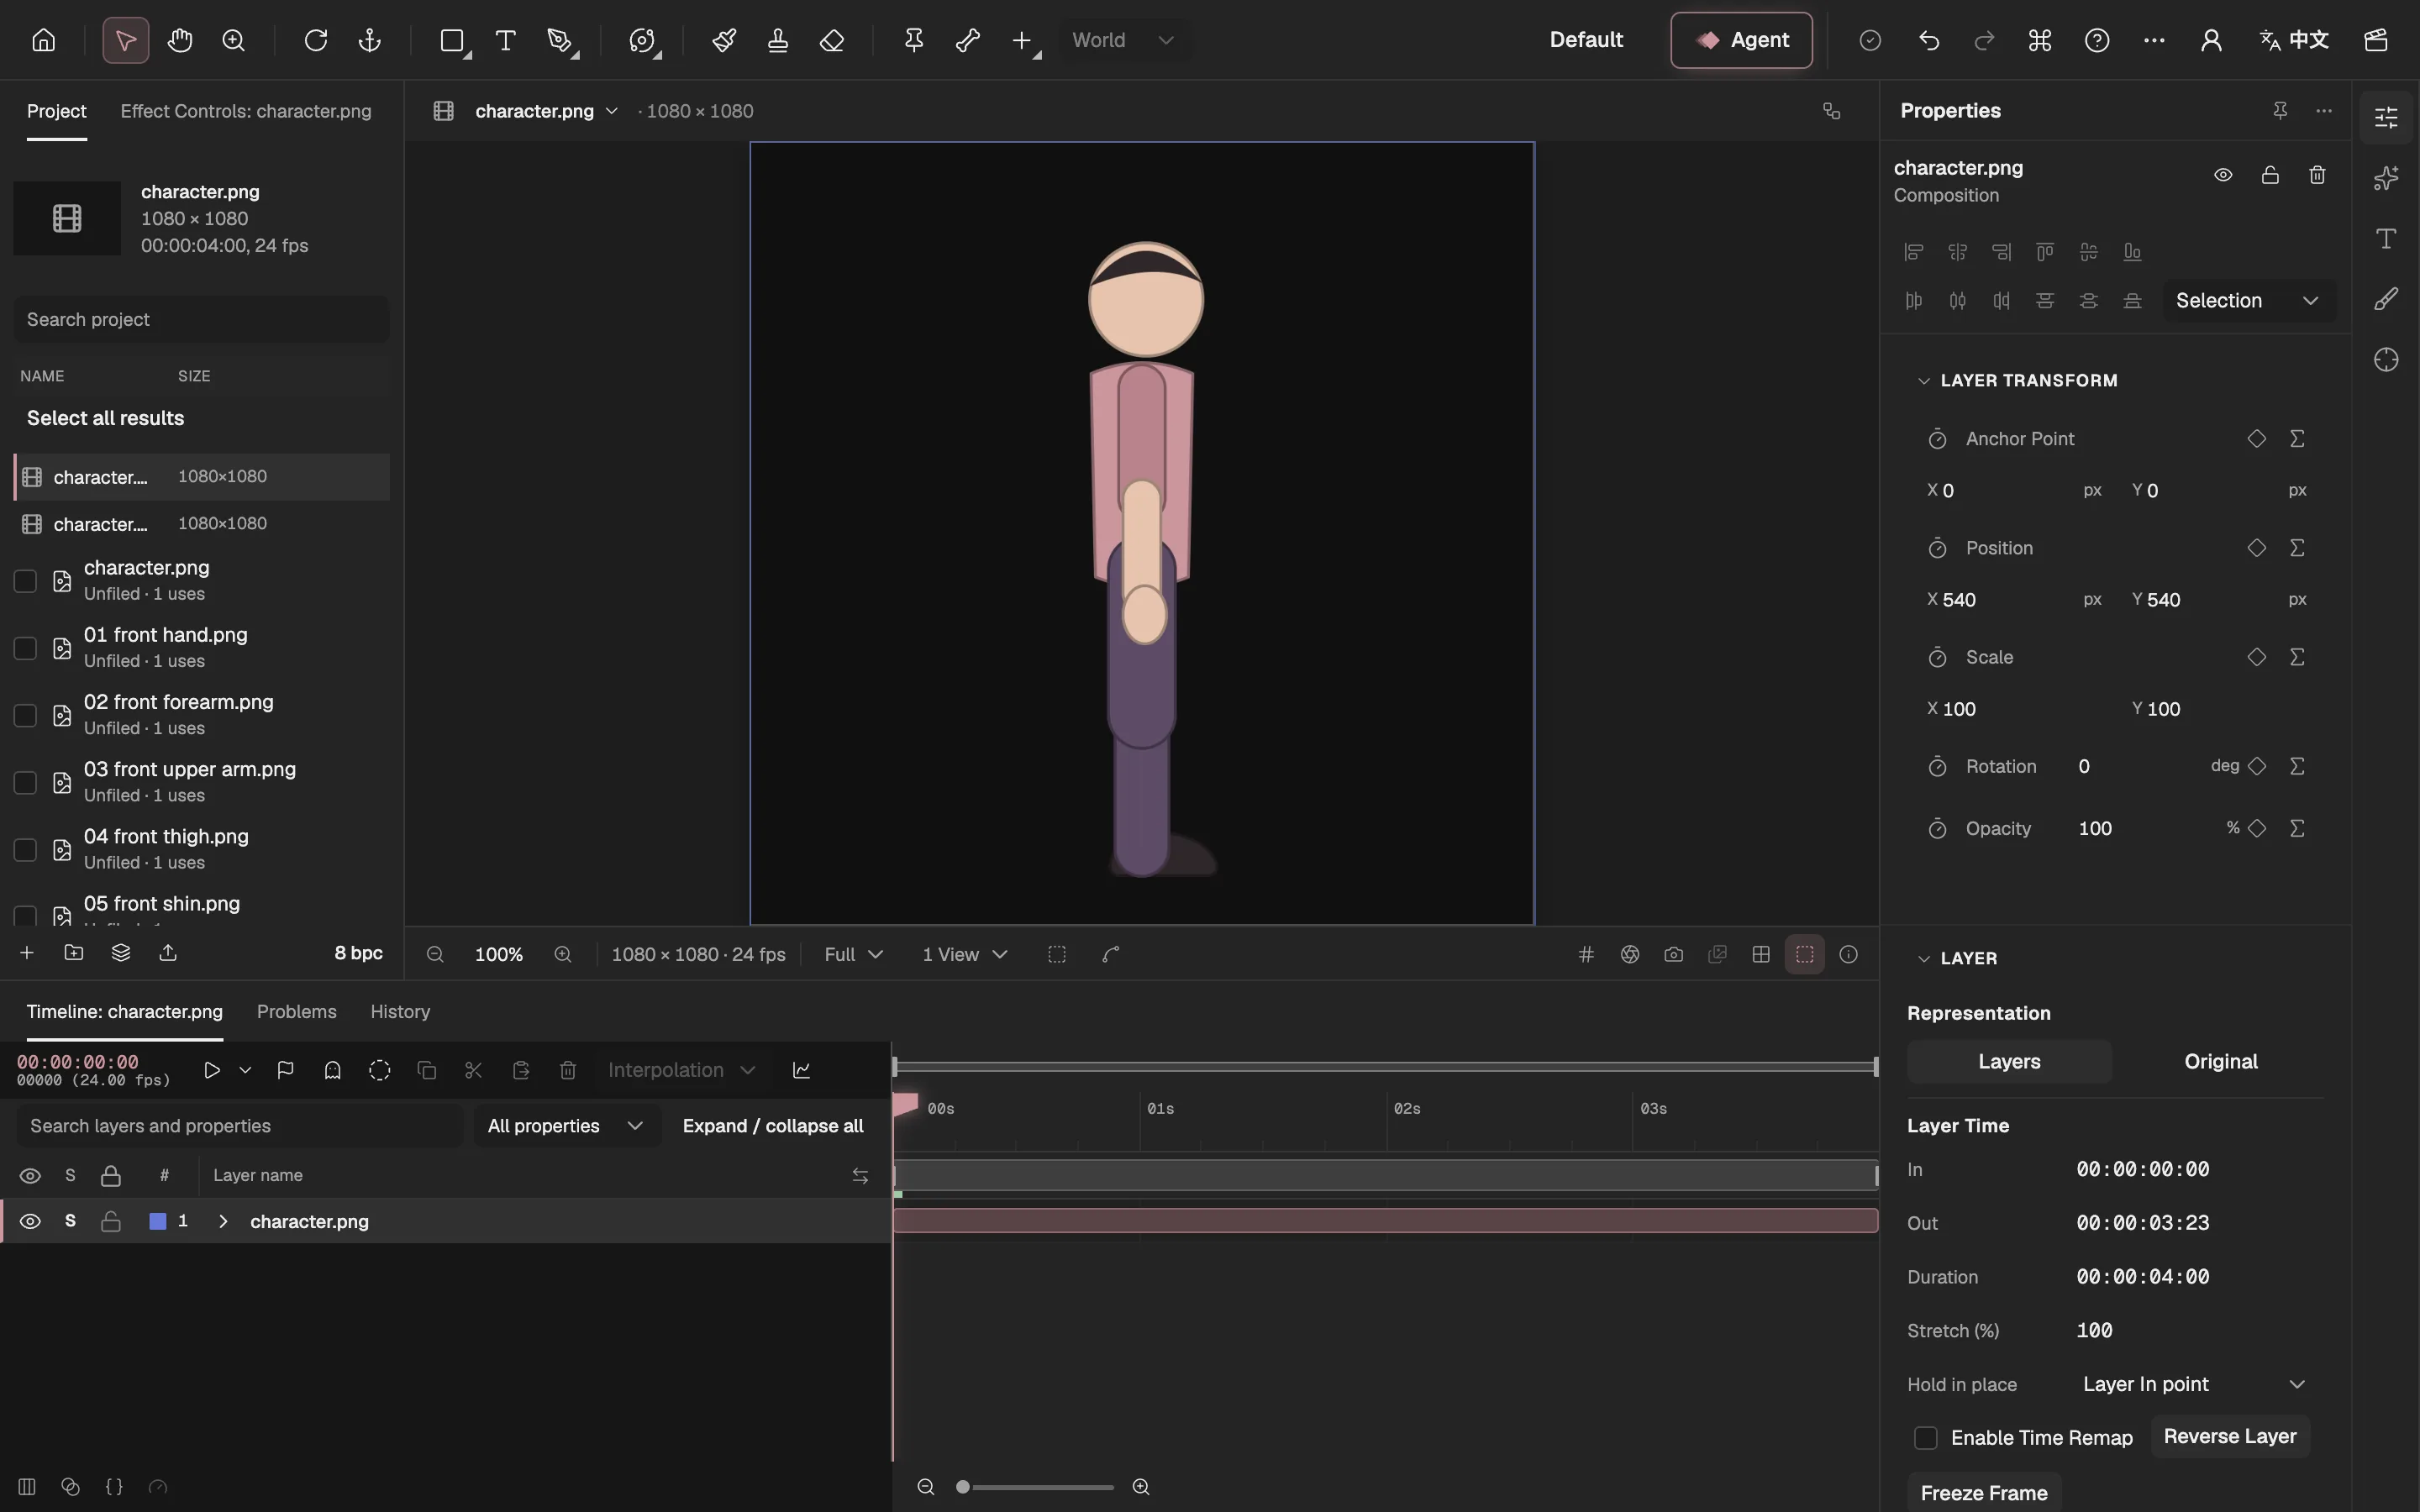
- Shows the parts, or the original picture.
- The same layer, now holding the parts.
- The parts’ own composition.
The layer keeps its place, name and animation, but now holds the parts: it becomes a composition of its own, which you can open from the Project panel. Inside it, the original picture is kept as a hidden, locked layer whose name ends in “— Original”, so nothing is lost.
Under Representation, switch between Layers and Original to compare. The choice is saved with the project and can be undone.
Pictures, video and sound
The same Upload file button takes files of every kind, one or many at a time, and they all go through the same review. Each file you import becomes a layer of its own kind in the open composition, and is listed in the Project panel (opens in a new tab).
- Pictures: PNG, JPEG and WebP, up to 20 MB each, and SVG (see below).
- Video: MP4 and WebM, up to 128 MB each.
- Sound: MP3, WAV, OGG and M4A, up to 128 MB each. A sound becomes an audio layer, drawn as a waveform in the Timeline.
- Other kinds of file stop the whole import, and nothing is added: take the file out, or convert it to one of these first.
3D models and environment light
- 3D models: glTF (external website, opens in a new tab), as a .glb file or as a .gltf file with its textures and data inside it, and OBJ, up to 128 MB each. A model becomes a 3D Model layer.
- Environment light: a Radiance HDR picture (.hdr), up to the same size, becomes a Light layer that lights the 3D layers from every direction, the way a sky would.
- A .gltf whose textures or data are separate files can’t be read: export the model as a .glb instead.
SVG drawings as shapes
An SVG file comes in as a picture at its own size and keeps its drawing with it. To edit the drawing itself, turn it into shapes:
Right-click the SVG’s layer in the Timeline.
Choose Create → Create Shapes from Vector Layer.
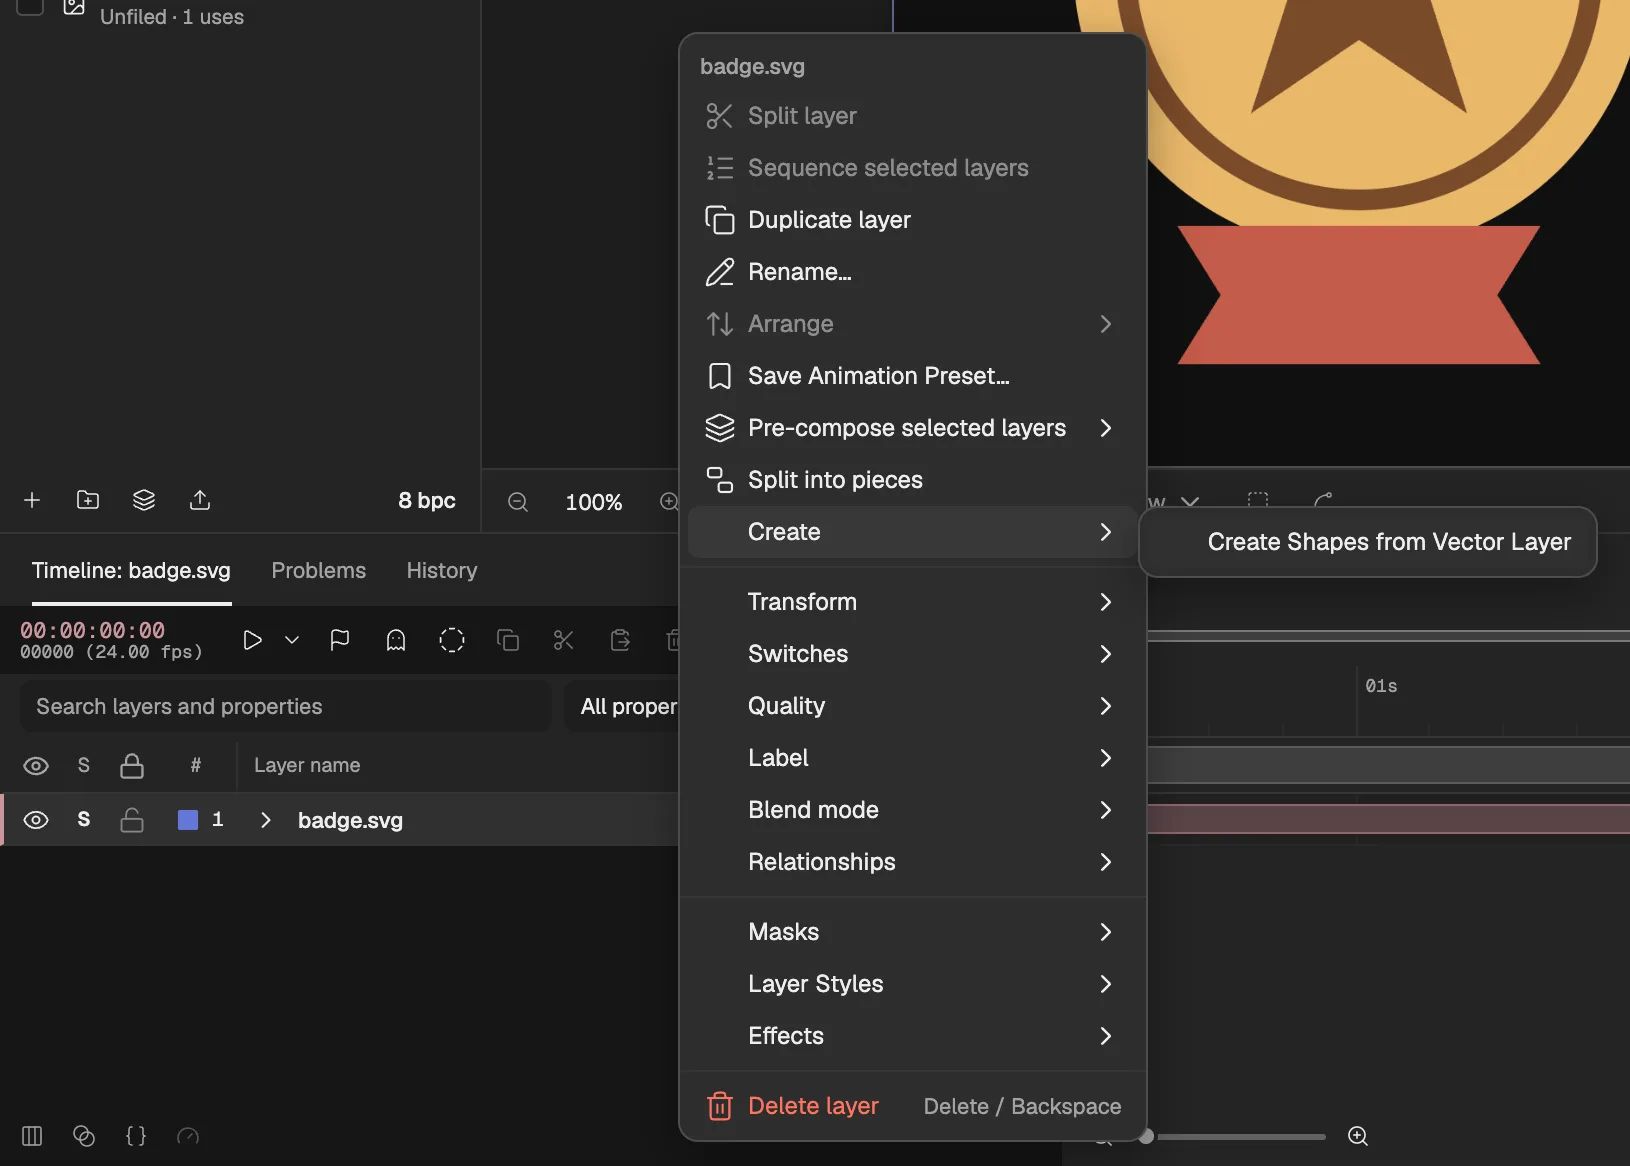
- The SVG’s layer.
- The Create menu.
- Turns the drawing into shapes.
A new shape layer appears with a group for each shape of the drawing, with its paths, fill and stroke, and the SVG’s layer is hidden. Edit, recolour and animate the shapes like any you draw yourself.
Fonts
Text starts in the bundled font, Noto Sans SC (Bundled). To use one of your own:
Select a text layer.
Select Import font next to Font, in Properties or on the Character page of the Text panel, and choose an OpenType, TrueType or WOFF file (.otf, .ttf or .woff).
The layer takes the font at once. The font is saved in the project, and a project file carries it, so every text layer in the project can choose it from the Font list.