Text and shapes
Text
A text layer holds a block of text you type in the viewer. Its font, size and colour belong to the whole layer; text animators then move, fade or recolour it character by character, word by word or line by line, as in After Effects.
Add a text layer
Choose the Text tool (T) in the toolbar and click in the viewer where the text should start. The Text panel opens on the right.
Type. Enter starts a new line. To finish, press ⌘Enter (Ctrl Enter on Windows) or click elsewhere; Esc throws the text away.
Change the words later in the Timeline: open the layer, then its Source Text row, and click the text. Source Text has a stopwatch too, so the words can change at a keyframe.
The Text tool makes point text, which grows as you type. New layer → Text in the Project panel adds a paragraph box instead, which wraps its lines. Switch between the two in Properties under Layer › Text Source › Text layout: Point text, or Paragraph box with its width and height.
Character and paragraph settings
The Text panel on the right has two pages, Character and Paragraph, for the selected text layer. They show the same settings as the Text and Paragraph sections of Properties, and most of them have a stopwatch, so they can be animated.
- Character: the font, size and weight, faux bold and italic, caps, baseline shift, horizontal and vertical scale, kerning, the fill colour, and a stroke with its colour and width, drawn over or under the fill.
- Paragraph: line height, letter spacing, alignment, the three indents, and the space before and after a paragraph.
- Fonts: every text layer starts in Noto Sans SC (Bundled), which covers Chinese as well. Import font, under Font, adds a font file to the project; see Fonts (opens in a new tab).
- The whole layer: these settings apply to all of the layer’s text. To colour or size part of it differently, use an animator with a selector (below), or put that part in a layer of its own.
Animate text with animators
An animator changes text unit by unit. It holds one or more properties, the values to apply, and one or more selectors, which say how strongly each character, word or line takes them. Animating the selector, not the values, is what makes text type on, ripple, or fade in a letter at a time.
Add an animator. In Properties, at the heading of the Text Animation section, select Add Animator and choose a property: Anchor Point, Animator Position, Animator Scale, Skew, Skew Axis, Animator Rotation, Animator Opacity, Fill Color, Stroke Color, Stroke Width, Animator Tracking, Line Spacing, Character Offset, Character Value, and Blur. The animator starts with a Range Selector covering all of the text.
Set the value under Text Animation to what the selected text should become, for example an Animator Opacity of 0.
Animate the selector. Key its Selector Start, Selector End or Selector Offset (see Set keyframes (opens in a new tab)). As the range sweeps across the text, each character takes the value in turn.
Add more. Under Layer › Text Animators, an animator’s Add menu gives it another property or another selector; × takes a property out, and the bin removes the animator. A layer can have several animators, and their changes add up.
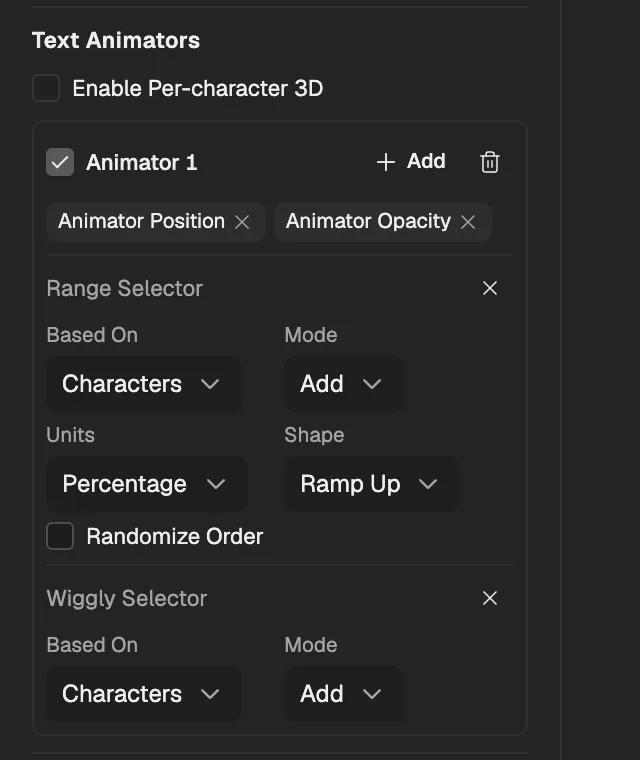
- Enable Per-character 3D, for a 3D text layer.
- The animator: untick it to turn it off.
- Adds a property or a selector to the animator.
- Its properties; × takes one out.
- A Range selector, with its Based On, Mode, Units and Shape.
- Ramp Up gives the range a soft edge instead of a hard one.
- A second selector, a Wiggly one, combined with the first by its Mode.
Selectors
Every selector counts the text by Based On (Characters, Characters Excluding Spaces, Words, and Lines) and gives each unit an amount. An animator’s selectors combine from top to bottom, each by its Mode (Add, Subtract, Intersect, Min, Max, and Difference).
- Range Selector: selects from Selector Start to Selector End, moved along by Selector Offset, as a percentage of the text or by count (Units). Shape sets how the amount rises and falls across the range, Selector Smoothness, Ease High and Ease Low soften it, and Randomize Order takes the units in a shuffled order.
- Wiggly Selector: gives each unit an amount that wanders between Min Amount and Max Amount, at Wiggles/Second; Correlation makes neighbours move together. It needs no keyframes and plays the same every time.
- Expression Selector: its Amount is an expression worked out once for each unit, starting as
selectorValue * textIndex / textTotal. See Expression basics (opens in a new tab) and the text values (opens in a new tab) it can read.
Per-character 3D
Turn on the layer’s 3D layer under Layer in Properties, then tick Enable Per-character 3D under Text Animators. Each character then has a place of its own in depth, and animators offer Z Position, X Rotation, and Y Rotation as well, so letters can fly in towards the camera or turn over one by one.
Text presets
Presets, beside Add Animator, adds a ready-made animator that runs for one second from the current frame, or up to the layer’s end. Afterwards it is an ordinary animator, which you can retime and change:
- Typewriter
- Fade In Characters
- Slide Up Words
- Scale In Characters
- Blur In
- Tracking In
- Random Fade
- Rotate In Characters
- Wiggle Characters
A preset needs the playhead inside the layer, with room for it to run.
Text on a path
Draw the path on the text layer. With the text layer selected, draw with the Pen tool (G). On a layer that is not a shape layer, the pen draws a mask (see Draw a mask (opens in a new tab)).
Make it the path. In Properties, under Layer › Path Options, choose that mask as the Path. The text now runs along it.
Keep the mask from cutting the text. Under Masks, set that mask’s mode to None, so it only guides the text.
Place the text. Reverse path, Perpendicular to path and Force alignment change how it sits on the path. First Margin and Last Margin, in the Path Options section of Properties, move it along; key them to slide the text along the path.
Shapes and masks from text
Right-click the text layer in the Timeline and open Create.
Choose Create Shapes from Text for a shape layer with a group for each character: its outlines as paths, with the text’s fill and stroke. Edit and animate them like any shape (see Groups and contents (opens in a new tab)).
Or choose Create Masks from Text for a solid in the text’s colour, as big as the composition, with a mask for each outline; the holes of letters like “o” subtract.
Either way, the new layer is named after the text layer with “Outlines” added, and goes above it; the text layer is hidden. The outlines are the text as it is at the current frame. The commands are unavailable for a 3D text layer, text on a path and per-character 3D.
Good to know
- One text layer has one style. Different fonts, sizes or colours for single characters inside one layer are not supported yet, and nor are an OpenType features panel or vertical text.
- An imported font becomes part of the project, like a picture you import.
- A text layer can also be extruded into 3D, with a bevel: see Extruded text and shapes (opens in a new tab).