Masks, mattes and keying
Track mattes and keying
A track matte shows a layer only where another layer is, through that layer’s alpha or its brightness. Keying removes a background of one colour, such as a green screen. Both work as in After Effects.
Show a layer through another
Put both layers in the composition: the matte, such as a text or a shape layer, and the layer to show through it.
Select Show Modes columns in the Timeline.
In the Track matte column of the layer to show through, choose the matte layer. Track matte under Layer › Relationships in Properties does the same. As in After Effects, the matte layer’s video switches off, so it no longer draws itself.
Choose how it reads the matte in Matte mode:
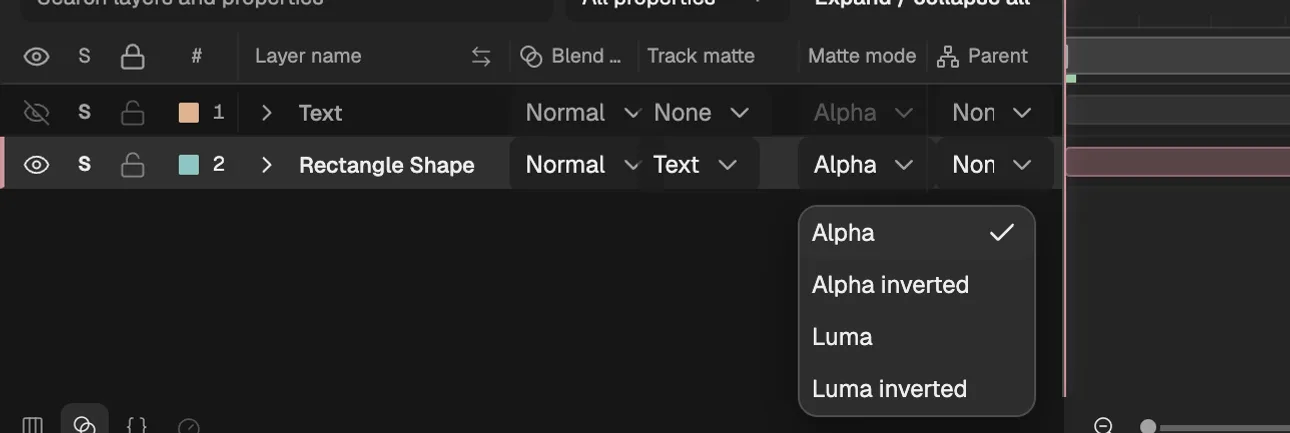
- The matte layer.
- The layer’s Track matte: the layer it shows through.
- Alpha: through the matte’s opacity.
- Luma: through the matte’s brightness.
- Alpha
- Shows the layer where the matte layer is opaque.
- Alpha inverted
- Shows it where the matte layer is transparent.
- Luma
- Shows it where the matte layer is bright, and hides it where the matte is black.
- Luma inverted
- Shows it where the matte layer is dark.
- Any layer above or below can be the matte, and one layer can be the matte of several.
- A matte layer with its eye off still works as the matte. Turn its eye back on to see it as well; changing only Matte mode leaves the eye as it is.
- The matte layer is used with its own position, masks and effects, and only within its own in and out points: outside them the matte is empty.
Set Matte
The Set Matte (opens in a new tab) effect takes a layer’s matte from another layer, as an effect among its others.
Select the layer to show through and add Set Matte from Effects & Presets, under Channel.
In Effect Controls, choose the matte layer in Take Matte From Layer, and in Use For Matte whether its alpha or its luminance makes the matte.
Hide the matte layer with its eye if it should not show itself.
Invert Matte uses the opposite; Stretch Matte to Fit fits a matte layer of another size to this one; Composite Matte with Original keeps the layer’s own transparency as well. More effects that read another layer are in Effects that read another layer (opens in a new tab).
Key out a green or blue screen
A key makes one colour of a picture transparent, so a subject filmed against a screen can go over another background. The keys are under Keying in Effects & Presets.
Put the new background below the footage in the Timeline, and select the footage.
Add Screen Key (opens in a new tab) and set its Screen Color to the colour of the screen.
Check the matte. Set View to Combined Matte: the subject should be white and the screen black. Adjust Screen Gain and Screen Balance until the screen is gone, and use Clip Black and Clip White to clean up grey patches.
Set View back to Final Result. Despill takes the screen’s colour out of the subject’s edges.
- Linear Color Key (opens in a new tab) keys any one colour, matched by RGB, hue or chroma within a tolerance and a softness; it can also keep only that colour.
- Spill Suppressor (opens in a new tab) takes a colour’s cast out of what remains after a key.
Clean up a matte
- Simple Choker (opens in a new tab) shrinks the matte’s edge, or spreads it with a negative value, to remove a fringe.
- Refine Soft Matte (opens in a new tab) rebuilds a soft edge, for hair or motion blur, and can take the background’s colour out of it.
For a subject with no screen behind it, the Roto Brush tool (R) separates it from any background with guide strokes, and its Refine Edge strokes clean up the edge (see Cut out a subject with Roto Brush (opens in a new tab)).