Compositions
Compositions and pre-compositions
A composition is where an animation happens: a frame of a set size, frame rate and length, with layers stacked in it. A project can hold many compositions, and one composition can sit inside another as a layer.
Create a composition
Select New composition, the + at the bottom of the Project panel. The dialog starts from the settings of the composition you are in.
Name it and pick a Preset: HD (1920 × 1080), 4K UHD (3840 × 2160), Square (1080 × 1080), and Vertical (1080 × 1920). Or type a Width and Height; while the aspect ratio is locked, changing one changes the other.
Choose the Frame rate and Duration (HH:MM:SS:FF). The frame rate (external website, opens in a new tab) is 24, 25, 30, and 60 frames per second. The duration is written as hours, minutes, seconds and frames.
Choose a Background. With Opacity (%) at 0 the background is transparent; picking a colour sets it to 100.
Select Create. The new composition opens in the Viewer and is listed in the Project panel.
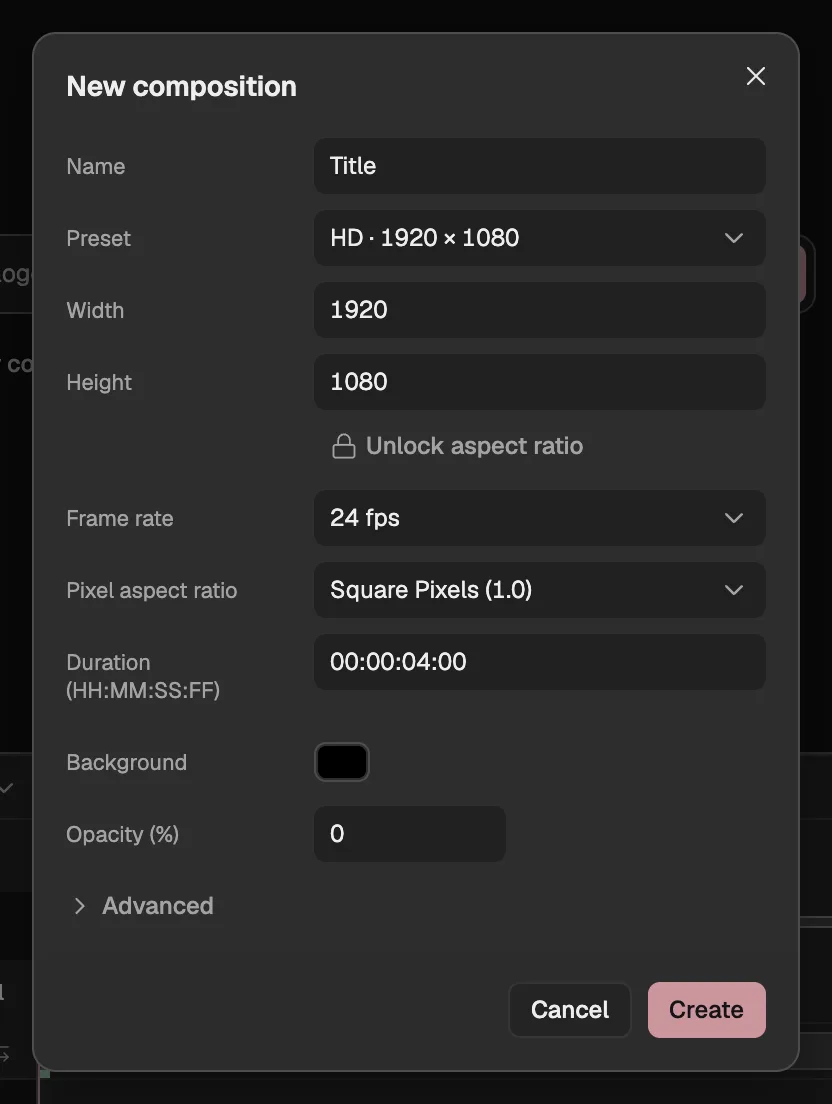
- Common sizes.
- Any size; the lock keeps the shape.
- Frames per second.
- How long the composition is.
- The colour behind every layer, and how opaque it is.
- Start timecode, work area and motion blur.
To match a picture or video you imported, select the film button beside it in the Project panel instead: the new composition takes its size and pixel aspect ratio, and a video’s frame rate and length.
Pixel aspect ratio is for footage made for video formats whose pixels are not square (pixel aspect ratio (external website, opens in a new tab)). Leave it at square pixels for anything made for screens.
Change a composition’s settings
Double-click a composition in the Project panel, or select the pencil beside it, to open Composition settings. It has the same fields as a new composition, and applying them is one step you can undo.
- Advanced holds the Start timecode (HH:MM:SS:FF), the time the first frame is labelled with; the work area, explained in Previewing (opens in a new tab); and Motion blur with its shutter, explained in Motion blur and frame blending (opens in a new tab).
- Making a composition longer does not make its layers longer: each keeps its Out point. Extend a layer by dragging the end of its bar in the Timeline, or see Layer timing (opens in a new tab).
- Making a composition shorter shortens its work area with it.
- Colour depth and the working colour space belong to the whole project, not to one composition. Select 8 bpc at the bottom of the Project panel to open Project Settings, where Depth and Working Space are set (see Project settings (opens in a new tab)).
Work with several compositions
Every composition is listed in the Project panel with its size. Select one to open it: the Viewer, the Timeline and Properties follow.
The composition’s name above the Viewer opens a menu: Nested compositions lists the compositions placed in this one, and All compositions lists every composition in the project. When you open a nested composition from there, the compositions it sits in stay listed to the left of its name, so you can step back out.
A composition can be deleted with the bin beside it in the Project panel, unless it is the project’s first composition or another composition still uses it.
Pre-compose layers
Pre-composing moves layers into a composition of their own, so they can be animated, timed or given effects as one.
Select the layers in the Timeline. They must be next to each other in the stack, and unlocked.
Right-click one of them and point to Pre-compose selected layers.
Choose what moves. Move all attributes into the new composition moves the layers, with everything on them, into a new composition the size and length of this one; one layer in their place shows it. Leave all attributes takes a single layer’s picture into a new composition the size of that picture, while the layer keeps its transform, effects, masks, switches and timing.
- The new composition is listed in the Project panel. One layer gives it that layer's name with “Comp 1” after it; several layers make it “Pre-comp 1”. The number goes up when that name is taken.
- Leave all attributes works on one layer at a time, and not on cameras, lights, nulls, audio or skeletons, which have no picture of their own.
- If moving the layers would break an expression that refers to them, the layers are not pre-composed.
Nest one composition in another
Open the composition that should hold the other one, then choose it under Precompositions in the New layer menu. Only compositions that would not end up inside themselves are listed.
The new layer is a pre-comp layer: it shows the nested composition’s frames, and it can be moved, timed, masked and given effects like any other layer. Changes inside the nested composition show wherever it is used.
With Collapse Transformations on, a pre-comp layer’s own layers join the outer composition’s cameras, lights and depth instead of being drawn flat first.
The composition flowchart
Composition Flowchart, the button at the right end of the bar above the Viewer, draws what the open composition is built from: the compositions nested in it and the files they show, with arrows pointing to the composition that uses each one.
Tick Layers to add each layer between its source and its composition, and Effects to add the effects on them; an effect that is switched off is struck through. Select a box to go there: a composition opens, a file is selected in the Project panel, and a layer or effect selects its layer.
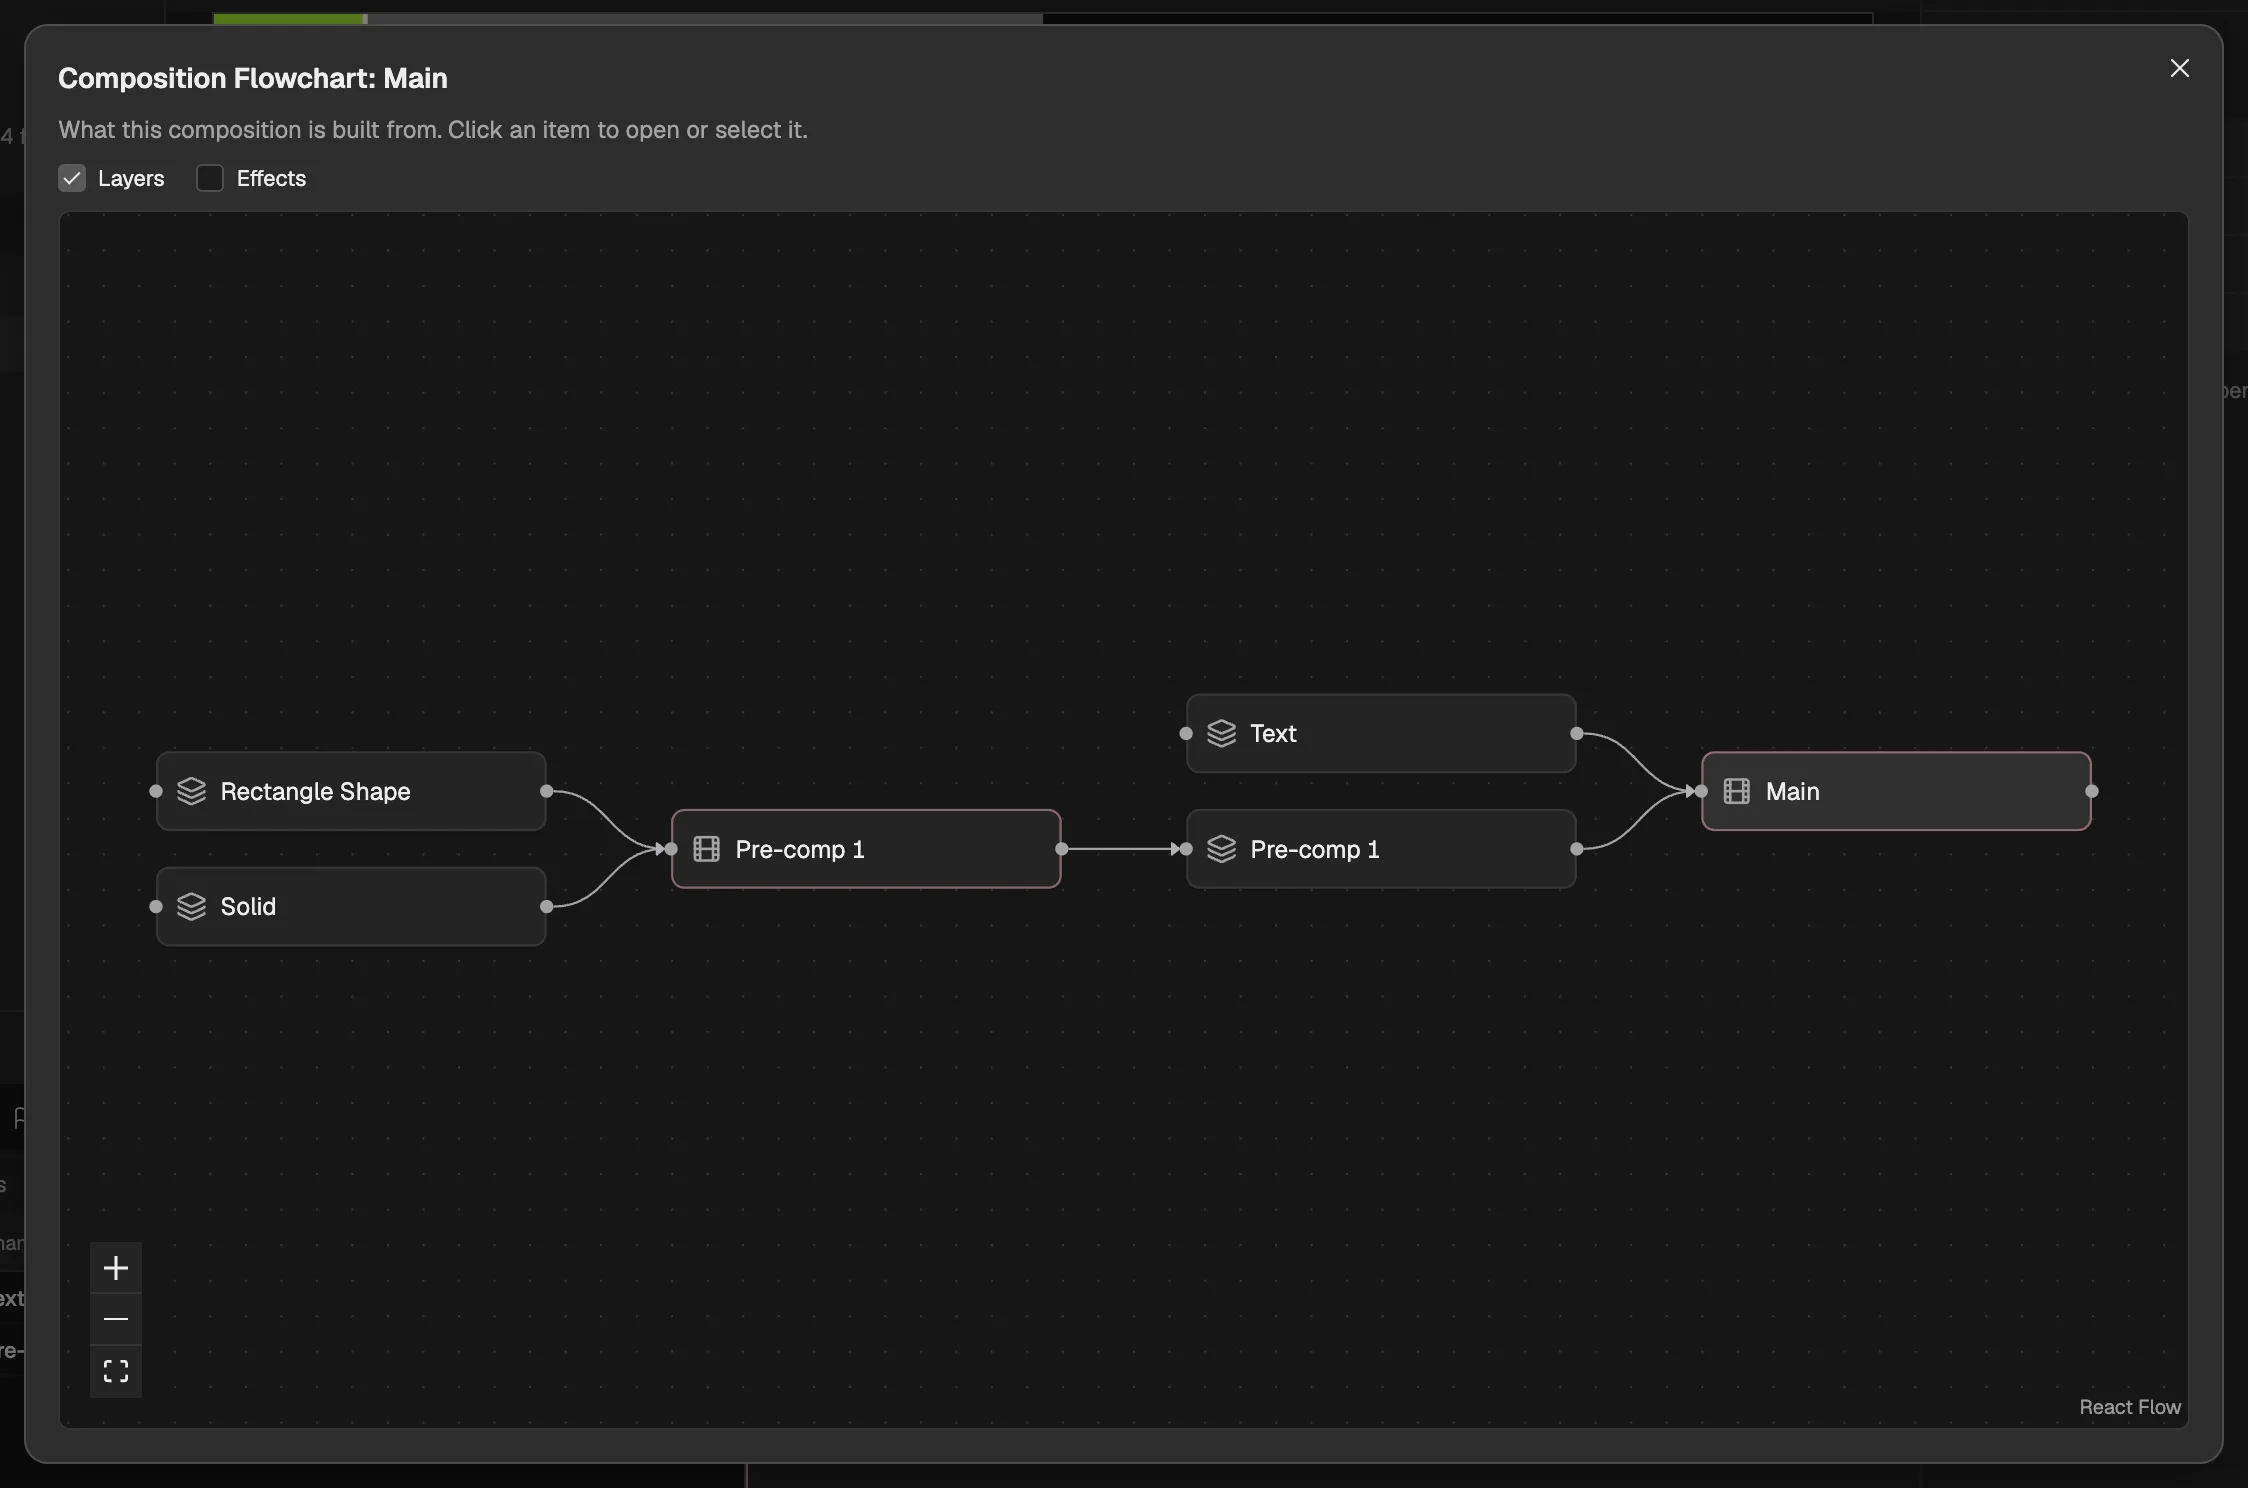
- Show layers, and effects.
- A composition nested in Main.
- A layer, between its source and its composition.
- The composition the flowchart is for.
Composition guides
Ruler guides belong to the composition: they are saved with it, and adding or moving one is a step you can undo. Turn on Rulers and Guides in Grid and guide options on the bar under the Viewer, then drag a guide out of a ruler. Drag a guide off the picture to remove it.
With Snapping on in the same menu, layers you drag snap to the guides. Whether the rulers, grid and guides are shown is a setting of this browser; it does not change the project or what is exported (see The workspace (opens in a new tab)).