Projects and assets
The Project panel
The Project panel lists everything a project holds: its compositions and the files you imported. Here you file them in folders, replace and interpret footage, give large files proxies, and set the project’s colour.
What the panel shows
At the top, the open composition’s size, duration and frame rate. Under it are a search box and one list of compositions and imported files, filed in folders. Select a composition to open it in the Viewer; double-click it, or select its pencil, to change its settings.
Point at a file to see its buttons: footage actions (…), a pencil to rename it or choose its folder, Interpret Footage, a new composition made from it, and + to add another layer that uses it. The line under a file’s name gives its folder, how many layers use it and its proxy, if it has one.
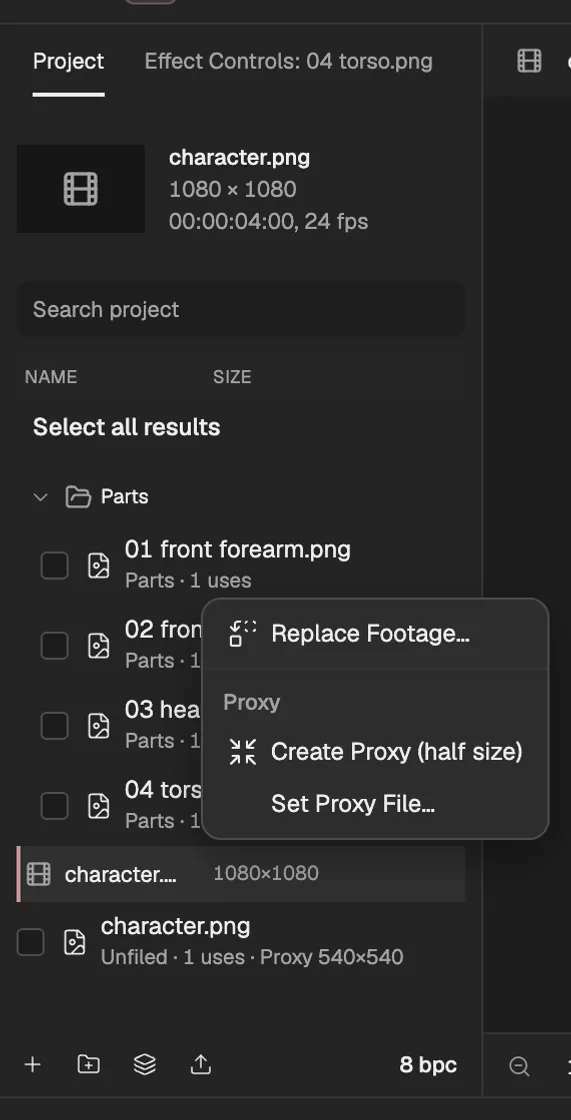
- The open composition.
- A folder, open.
- A file with a proxy says so under its name.
- In a file’s footage actions: replaces the file wherever it is used.
- Makes, chooses or switches a proxy.
- The project settings, named by the bit depth.
The buttons at the foot add a composition, a folder or a layer, import files (opens in a new tab), and open the project settings.
Folders
- Make a folder with New Folder at the panel’s foot, or by right-clicking the list. Type its name and press Enter.
- File things by dragging compositions, files and other folders onto a folder. Drag them onto an empty part of the list to take them out again. Folders go up to 6 levels deep.
- Rename a folder by double-clicking its name, or with its pencil. Delete it with its bin: what it holds moves up into the folder around it, so nothing is lost.
- Several files at once. Tick the boxes beside files, or select Select all results to tick what the search shows, then Rename selected to give them one name with a number each, or Move selected to file them together; up to 32 files at a time.
- Saved with the project. Folders are part of the project, and each change is one step that ⌘Z undoes.
Replace footage, or a layer’s source
- Replace a file everywhere. Open the file’s footage actions (…), choose Replace Footage and pick a file of the same kind: a picture, a video or a sound. Every layer that used the old file now shows the new one and keeps its animation and effects. The file keeps its Interpret Footage settings, and a layer still named after the old file takes the new name.
- Replace one layer’s source. Hold Alt (Option on a Mac) and drag a file or a composition from the Project panel onto a layer in the Timeline. That layer now shows what you dropped and keeps its properties, effects, masks and timing; other layers don’t change. A picture, video or composition layer takes a picture, a video or a composition, and a sound layer takes a sound.
- Undo either with ⌘Z: each is one step.
Proxies
A proxy is a smaller stand-in for a large picture or video. The Viewer and the preview draw it instead of the original to keep up, while export (opens in a new tab) always uses the original. Proxies are in the file’s footage actions (…):
- Create Proxy (half size) makes one inside the editor, half the width and height of the original.
- Set Proxy File uses a smaller file you made yourself: a picture for a picture, a video for a video.
- Use Proxy in Viewer switches the proxy on and off. The line under the file’s name then reads, for example, Proxy 960×540 or Proxy off.
- Remove Proxy deletes it.
- Sounds have no proxies. A proxy is saved with the project, and a project file carries it.
Interpret Footage
Interpret Footage, the sliders button beside a picture or video, sets how the file’s pixels are read. It changes every layer that uses the file, and is one step to undo.
- Alpha: how the file’s transparency is stored. Straight – unmatted suits most files with transparency; choose Premultiplied – matted with black when soft edges show a dark fringe, or Ignore to show the file fully opaque. Invert alpha swaps what is see-through and what is not.
- Frame rate (video only): Use frame rate from file, or a rate you assume instead.
- Pixel aspect ratio: for footage whose pixels aren’t square, such as DV or anamorphic video, so that it isn’t shown squashed or stretched. The list names each pixel aspect ratio (external website, opens in a new tab) by the format that uses it.
- Interpret as: the colour space (external website, opens in a new tab) the file was made in, when it isn’t sRGB.
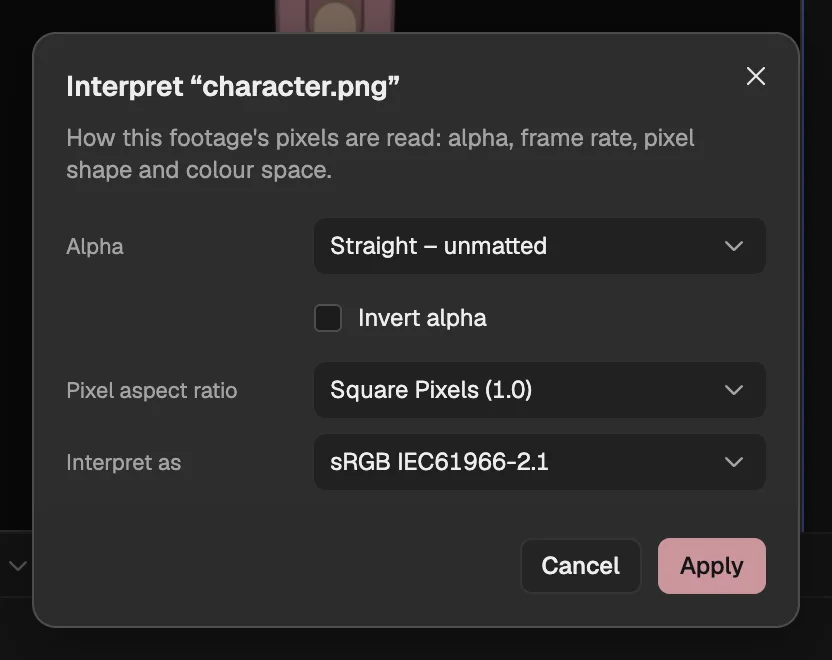
- How the file’s transparency is read.
- The shape of its pixels.
- The colour space it was made in.
Animation presets
An animation preset keeps effects and animated properties from one layer, to put on other layers later, in any project in this browser.
Save one. Right-click a layer and choose Save Animation Preset. Name the preset and tick the effects and animated properties it keeps.
Apply it. Select a layer and put the playhead where the animation should begin. In Effects & Presets, under Animation Presets, select Apply beside the preset. Its effects are added and its first keyframe lands at the playhead; properties the layer doesn’t have are skipped.
Presets are kept in this browser, not in a project: a project file doesn’t carry them, and another browser or computer doesn’t have them. Deleting a preset leaves the layers it was applied to as they are.
Project settings
The button at the right of the panel’s foot shows the project’s bit depth, such as 8 bpc. Select it to open Project Settings, which apply to every composition in the project.
- Depth: how finely each colour channel is stored. Higher depths keep gradients smoother as effects pile up, and 32 bits per channel (float) stores colour as floating-point numbers. Where the graphics card can’t blend 32-bit colour, that depth can’t be chosen.
- Working Space: the colour space the project works in, or None to leave colour unmanaged. Linearize working space works in that space with linear light.
- Blend colours using 1.0 gamma: blends layers in linear light, like the option of the same name in After Effects.
- Undo levels: how many steps the project’s history keeps. Lowering it drops the oldest steps.