Text and shapes
Shapes
A shape layer draws vector shapes: rectangles, ellipses, stars and paths you draw with the pen, each filled and stroked. Inside it, groups, paths and operators stack up as in After Effects, so a shape can be trimmed, repeated or warped, and every part of it can be animated.
Draw a shape
Choose a shape tool. The Rectangle tool (Q) in the toolbar holds all of them: Rectangle tool, Rounded Rectangle tool, Ellipse tool, Polygon tool, and Star tool. Hold, right-click, or press ↓ for more.
Drag in the viewer with no layer selected, or with a shape layer selected. Hold Shift for a square or a circle. Each drag makes a new shape layer, with the shape, a fill and a stroke in one group.
Change it in Properties: its size, position and roundness, or a star’s or polygon’s points (up to 100) and radii, are properties like any other, so they can be animated.
With a layer selected that takes masks, such as a picture, a solid or text, the same tools draw a mask on it instead (see Masks (opens in a new tab)). New layer → Rectangle Shape in the Project panel adds a rectangle shape layer too.
Draw a path with the Pen
Choose the Pen tool (G) with no layer selected.
Click to place points; drag as you place one to pull out its handles and make a curve.
Finish by clicking the first point to close the path, or by double-clicking or pressing Enter to leave it open. The path becomes a shape layer, “Bezier Path”.
- Edit a path: select its shape layer and, with the Pen tool (G), drag a point or a handle, click to add a point after the last one, or select a point and press Delete.
- Corners and curves: the Convert Vertex tool, under the pen, or the pen with Alt held, switches a point between corner and smooth when you click it, pulls out handles when you drag it, and moves one handle on its own.
- RotoBezier: tick it on a path to have its curves worked out from the points alone, with no handles to adjust.
- Shapes from the shape tools are not paths. To edit a rectangle’s points, choose Convert To Bezier Path from its ⋯ menu in Contents first. Until then, the pen on that layer draws a mask.
Groups and contents
In Properties, under Layer › Contents, a shape layer lists its groups. A group holds paths, then what changes them, then what paints them, and has a transform of its own; the Timeline shows the same tree with every value.
Add a group with Add group, or a group inside a group with Add child group from its ⋯ menu.
Add to a group from the same menu: another shape, a gradient fill or stroke, or a path operator. A new shape joins the group’s paths, and an operator goes before its fills and strokes, so it changes what they paint.
Arrange groups from the menu too: Duplicate group, move it up or down, Nest under previous group or take it out again, or delete it.
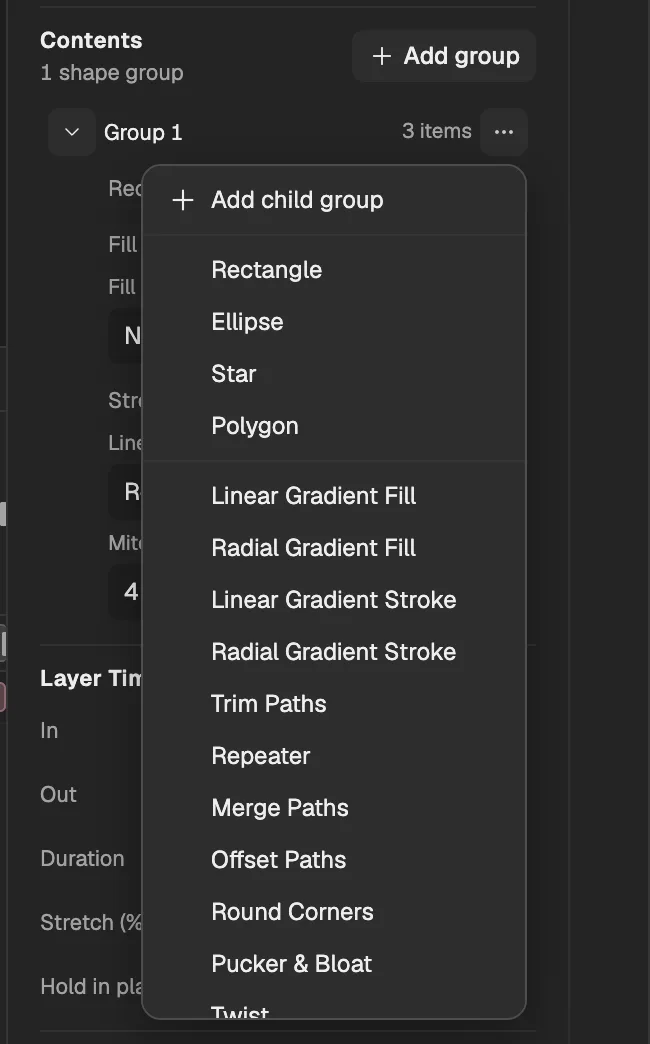
- Adds a group to the layer.
- The group’s menu.
- Shapes to add to the group: Rectangle, Ellipse, Star, and Polygon.
- Gradient fills and strokes.
- The path operators and the Repeater.
The group of a newly drawn shape holds its shape, Fill 1 and Stroke 1.
Fills, strokes and gradients
- Fill: its colour and opacity, and its Fill Rule, which decides whether overlapping paths leave holes.
- Stroke: its colour, opacity and width, Line Cap, Line Join and Miter Limit. Add Dash/Gap pair in its ⋯ menu makes it dashed, and Dash Offset runs the dashes along it.
- Taper and wave: a stroke’s Taper narrows it towards its start and end, by length, width and ease; its Wave makes it ripple, by amount, wavelength or cycles (Wave Units), and phase. Animate the phase to make the wave travel.
- Gradients: Linear Gradient Fill, Radial Gradient Fill, Linear Gradient Stroke, and Radial Gradient Stroke, from the group’s menu. Set their Start Point and End Point, and add stops with Add color stop and Add opacity stop in the gradient’s ⋯ menu.
Path operators
A path operator changes the paths before it in its group, before they are painted. Most of its values can be animated.
- Trim Paths
- Shows only part of each path, from Trim Start to Trim End, moved by Trim Offset; animate the end to draw a line on. Trim Multiple Shapes trims the paths together or one by one.
- Merge Paths
- Combines the group’s paths into one by its Merge Mode: Merge, Add, Subtract, Intersect, and Exclude Intersections.
- Offset Paths
- Grows or shrinks the paths by an amount, with a line join of its own.
- Round Corners
- Rounds every corner by a radius.
- Pucker & Bloat
- Pulls the points in and the curves out, or the other way round.
- Twist
- Twists the paths round a centre by an angle.
- Wiggle Paths
- Makes the paths jagged and keeps them moving, by size, detail and wiggles per second, with corner or smooth points.
- Zig Zag
- Turns each segment into ridges, by size and ridges per segment, with corner or smooth points.
- Wiggle Transform
- Moves, scales and turns the paths at random over time.
The wiggles use a saved random seed, so a frame looks the same every time it is rendered.
Repeater
A Repeater draws copies of everything before it in its group. Copies sets how many and Offset shifts which copy comes first; each copy moves, scales and turns from the one before by the Repeater’s transform, fading from Start Opacity to End Opacity. Composite puts each copy above or below the one before. Animate the rotation or the copies for a turning wheel or a growing row.
Shapes from text or SVG
Text becomes shapes with Create → Create Shapes from Text on the text layer’s menu (see Shapes and masks from text (opens in a new tab)). An imported SVG drawing becomes shapes with Create → Create Shapes from Vector Layer (see SVG drawings as shapes (opens in a new tab)).