Layers and properties
Transform, parenting and timing
A layer’s Transform says where it is, how big, how turned and how opaque; its parent can carry it along; its timing says when it starts and ends. All of it is set in Properties and the Timeline, and all of it can be animated.
Transform
Every layer that has a place in the picture has Layer Transform: Anchor Point, Position, Scale, Rotation and Opacity. Edit them in Properties or under the layer in the Timeline: type a value, or drag across it to scrub. To animate a property, select its stopwatch: see Keyframes and easing (opens in a new tab).
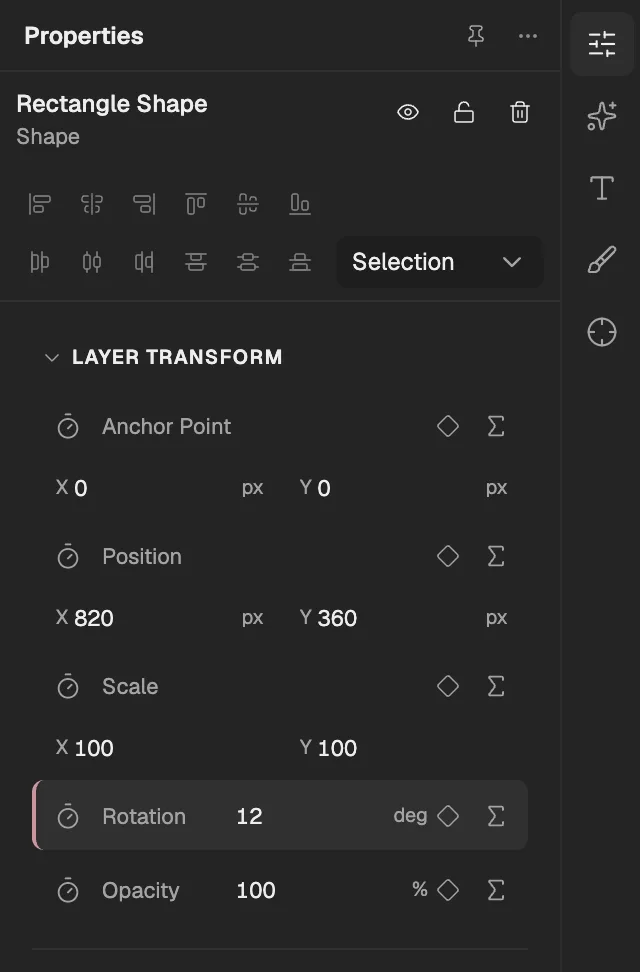
- The point the layer scales and turns round, in its own pixels.
- Where the anchor point sits in the composition.
- Size, in percent, for each axis.
- Angle, in degrees.
- From transparent (0) to solid (100).
- Starts animating the property with a keyframe.
In the Viewer, the Selection tool moves a layer, the Rotation tool turns it, and the Pan Behind (Anchor Point) tool moves its anchor point.
With the Timeline focused, A, P, S, R and T show only that property of the selected layers; hold Shift to add it to the ones shown.
A 3D layer adds Orientation and a rotation for each axis.
Separate dimensions
Position animates as one value: one keyframe holds X and Y together. To give each axis its own keyframes and curve, select Position, select Show Graph Editor in the Timeline, then Separate Dimensions. Select it again to join them. The Graph Editor (opens in a new tab) shows what you can do with the separate curves.
Parenting
A layer with a parent follows the parent’s position, scale and rotation on top of its own. Choose the parent in Properties under Relationships → Parent, in the Parent column of the Timeline (Show Modes columns), or from the layer’s right-click menu.
Choosing a parent keeps a 2D layer where it is: its own values change so that nothing moves. A 3D layer keeps its values instead.
A layer can also follow one bone of a skeleton: the bones are listed under their skeleton in the same menu (see Rigging (opens in a new tab)). A Null layer makes an invisible parent that moves a group of layers together.
Layer timing
A layer shows from its In point to its Out point, and its bar in the Timeline spans that time. Making the composition longer does not make its layers longer: extend each one.
- Drag the bar to move the layer in time; its keyframes and markers move with it.
- Drag either end of the bar to trim the layer.
- Alt-drag the bar (Option on a Mac) to slip it: the bar stays where it is and the layer’s content moves in time inside it.
- Ctrl+Alt-drag an end (⌘⌥ on a Mac) to stretch the layer in time; its keyframes stretch with it.
- [ and ] move the selected layers so they start or end at the current time; Alt+[ and Alt+] (⌥[ and ⌥] on a Mac) trim them there.
- On the layer’s right-click menu, Split layer cuts it in two at the current time, and Sequence selected layers places the selected layers one after another from the current time.

- The solid’s parent.
- The layer’s bar: drag it to move the layer.
- Its Out point, trimmed to 3 seconds.
- The solid’s In point, trimmed to 1 second.
- A layer marker.
Layer Time in Properties shows In, Out, Duration and Stretch (%) as values to type or scrub. Changing Duration or Stretch (%) stretches the layer in time, and Hold in place says which point stays put. Show In / Out / Duration / Stretch columns shows the same values as columns in the Timeline.
Video and pre-comp layers also have Enable Time Remap, which turns the layer’s time into a property you can keyframe; Reverse Layer; Freeze Frame, which holds the frame at the current time; and Loop Mode, which repeats the footage (Loop) or plays it back and forth (Ping-pong) for as long as the layer lasts.
Markers
Add layer marker, the flag in the Timeline’s toolbar, adds a marker at the current time to the selected layer. With no layer selected, it adds a composition marker on the time ruler instead.
Click a marker to go to its time. Right-click it to Edit marker, its name, time, length, colour and comment, or to Delete marker. A layer’s markers move with the layer.
Layer switches
Switches turn a layer’s behaviour on or off without touching its properties. The first columns of the Timeline hold Visibility, Solo and Lock; the rest are in the Switches columns, and F4 swaps those with the Modes columns.
- Visibility hides the layer; Solo shows only the soloed layers; Lock protects the layer from edits.
- Shy layer marks a layer to hide from the Timeline with Hide shy layers; it still renders.
- Guide layer: a guide layer shows in the Viewer, but not in exports or in compositions that nest this one.
- Layer Quality is one of Draft, Best (Bilinear), Best (Bicubic), and Wireframe.
- Continuously Rasterize keeps a shape or text layer sharp when it is scaled up; on a pre-comp layer the same switch is Collapse Transformations.
- 3D layer makes it a 3D layer; Motion Blur blurs it as it moves; Frame Blending blends the frames of stretched footage (see Motion blur and frame blending (opens in a new tab)).