Getting started
Quick start
Make your first animation in a few minutes. You don’t need to know After Effects: this page starts from nothing.
What Keyframe is
Keyframe is an animation studio that runs in your web browser. What you make is editable animation: a stack of layers whose position, size, colour and more change over time, and stay changeable. When you want a video or a picture, you export (opens in a new tab) one.
The editor draws everything on your graphics card with WebGPU, so it needs a current version of Chrome or Edge on a computer.
Your projects are saved in this browser, on this device. You don’t need an account to use the editor. To keep a copy, or to carry on on another computer, export the project as a file (opens in a new tab).
Open the studio
Select Open studio at the top of any page on this site. The studio opens straight into your project.
There is nothing to save by hand: every change is kept in this browser as you work, and is still there after you close the tab.
Your project
The studio keeps one project in this browser. A new project starts with one empty composition called Main. A composition is a scene: a canvas of a fixed size and a stretch of time, holding the layers that make up the picture.
While a composition is empty, the viewer shows Start your animation. You can describe what you want and select Continue with Agent to have the Agent (opens in a new tab) make it, or build it yourself, as this page does. New composition in the Project panel adds another composition.
To open a project file (opens in a new tab) someone sent you, or one of your backups, choose Project file (the … button at the top right) and then Import project. It replaces the project that is open, so choose Export project first if you want to keep that one.
The editor at a glance
The editor is laid out like After Effects. The numbers on the picture match the list under it.
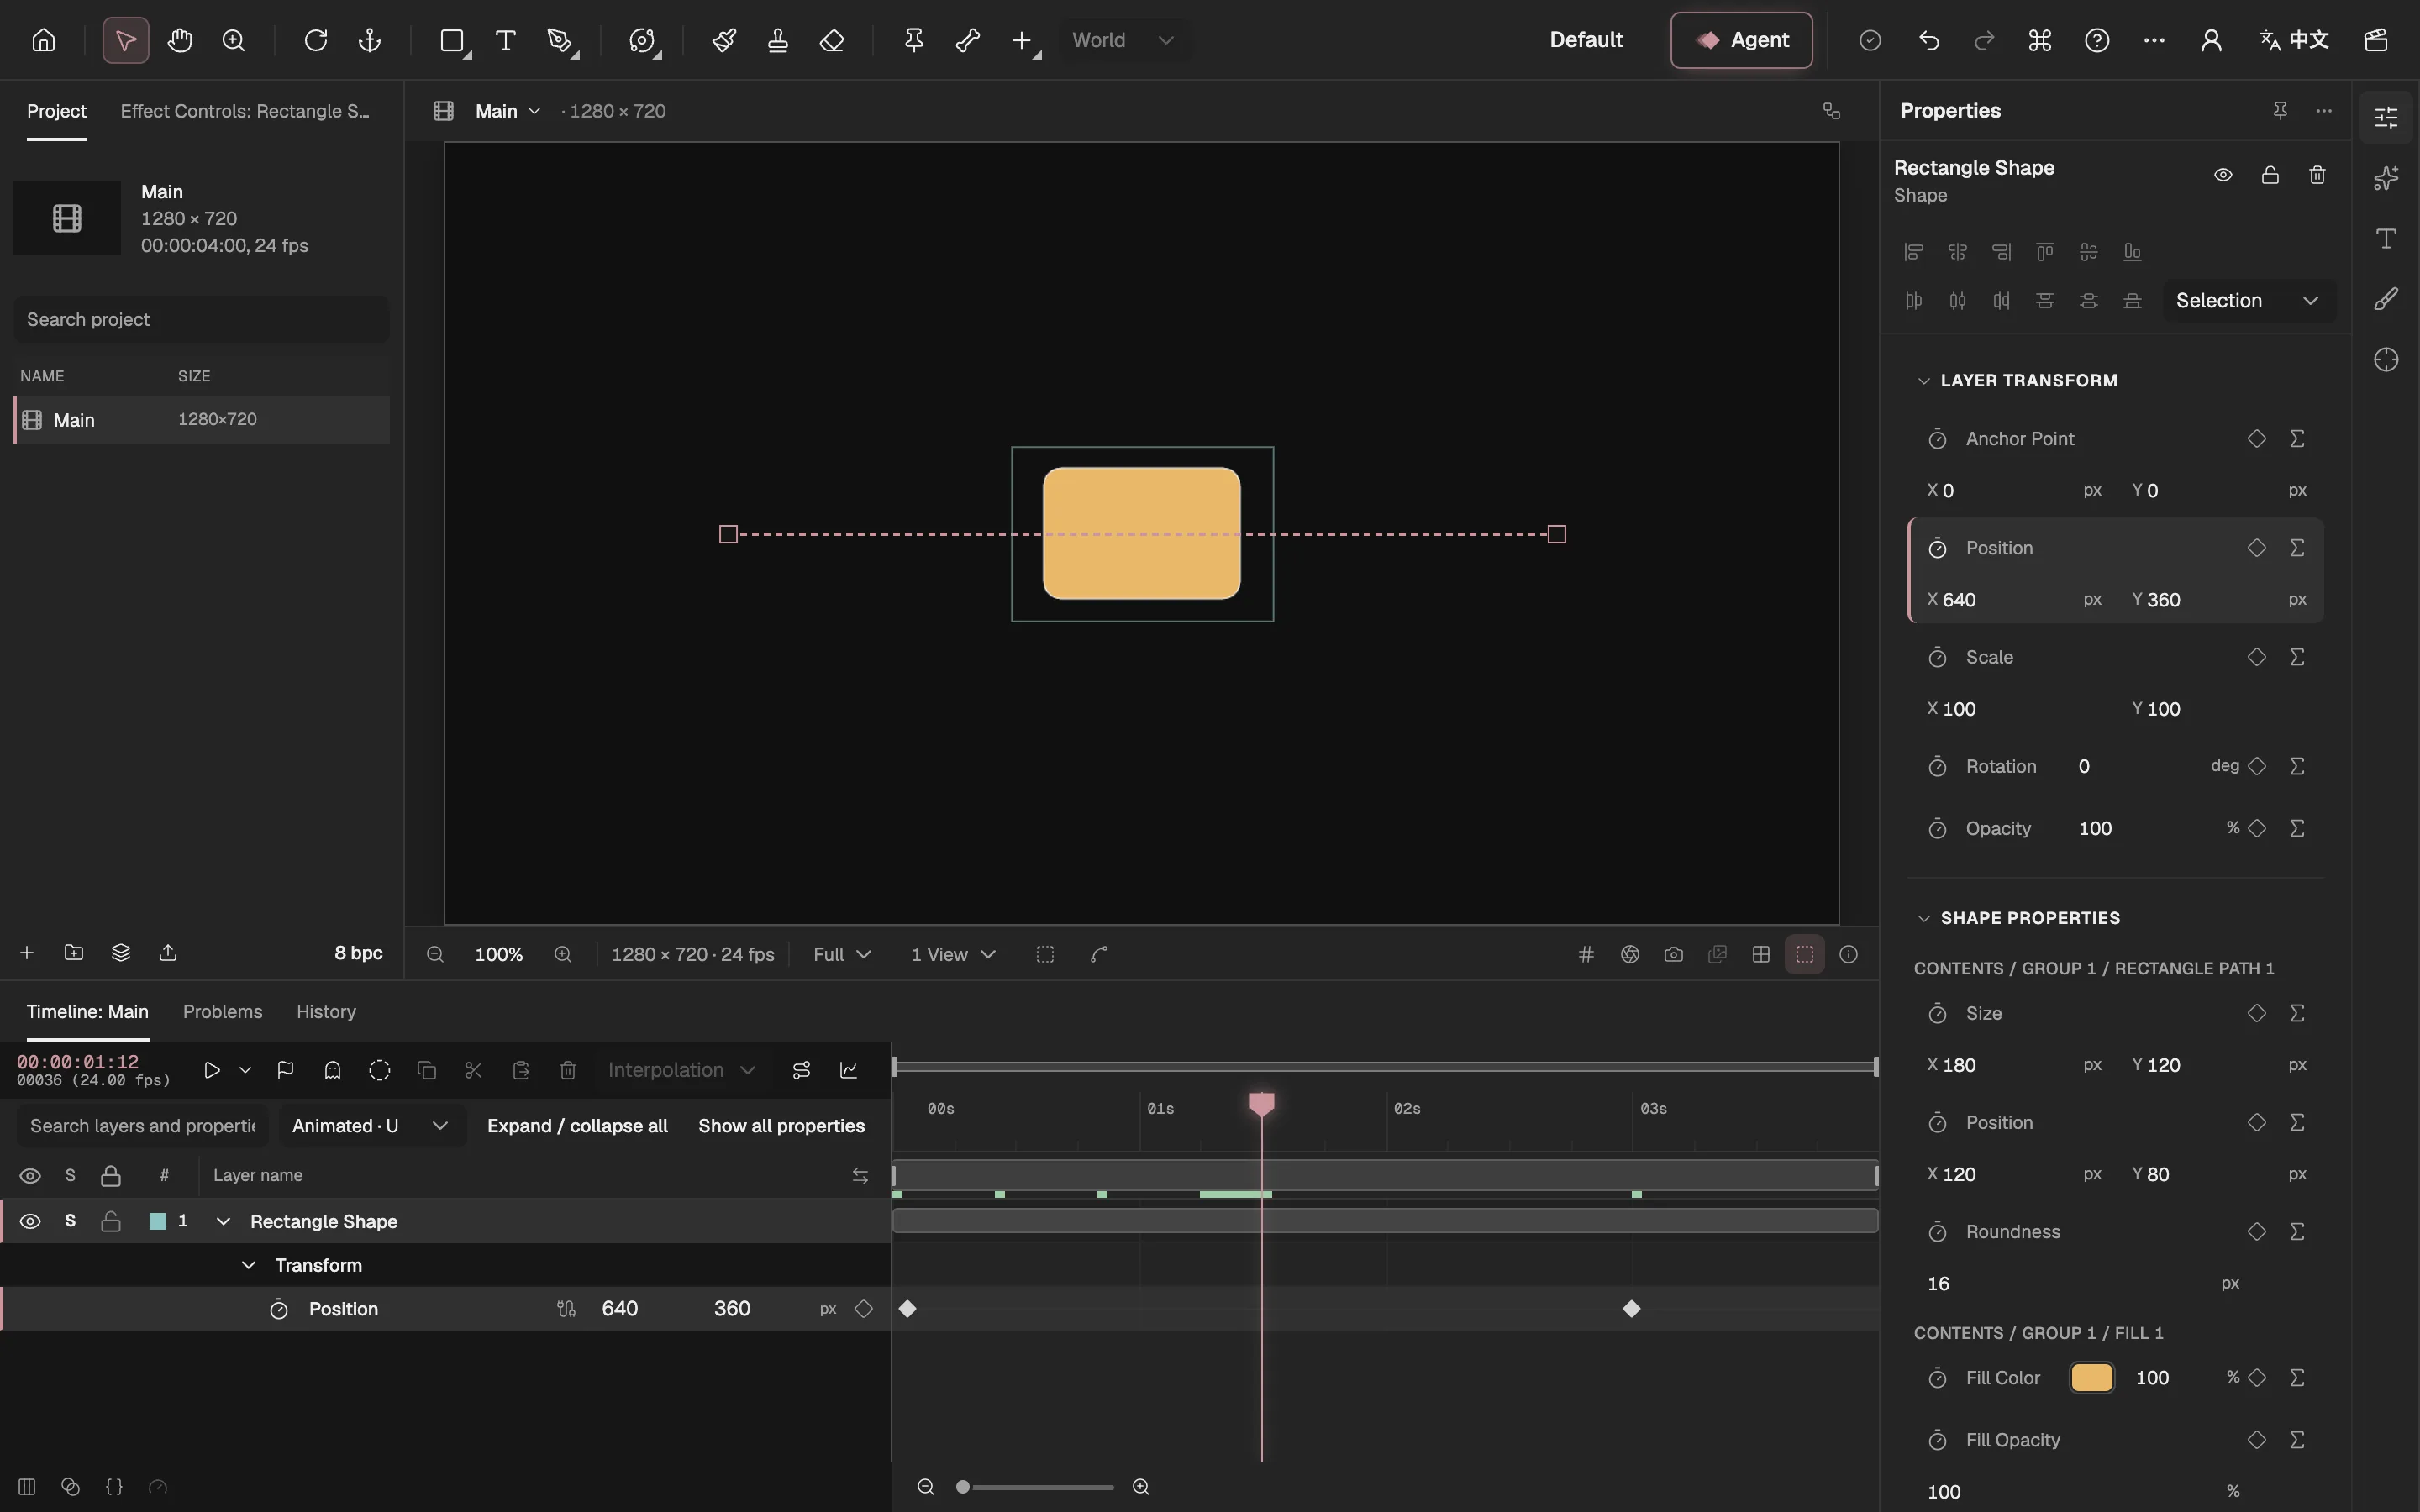
- ToolsThe tools you use in the viewer: selection, hand, zoom, shapes, text, the pen, brushes, bones and more. Rest the pointer on one to see its name and key.
- ProjectEvery composition and imported file in the project. New layer, New composition and file import are at its foot.
- Composition viewerThe picture at the current time. Select a layer here and drag it to move it.
- TimelineLayers stacked from front to back, with time running left to right. Keyframes show here as diamonds; the rose line is the playhead, the current time.
- PropertiesThe settings of what is selected: a layer’s Position, Scale, Rotation and Opacity, each with a stopwatch that animates it.
- AgentOpens a panel where you say in words what you want. The Agent plans the steps and makes the changes with the editor’s own tools; each change arrives as a draft you apply or discard, and stays editable after that.
- ExportSaves the animation as a video, an animated image or a sequence of pictures.
Make your first animation
Animation in Keyframe works as it does in After Effects. You give a property one value at one moment and another value at a later moment; the editor works out every frame in between. Each value you set at a moment is a keyframe.
Here you’ll move a rectangle from left to right in three seconds.
Add a layer. At the foot of the Project panel, select New layer (the stack icon) and choose Rectangle Shape. A rectangle appears in the middle of the viewer, already selected: its row is highlighted in the Timeline, and Properties shows its settings.
Start at the beginning. The time at the top left of the Timeline should read 00:00:00:00. If it doesn’t, drag the playhead back to the start of the ruler.
Set the first keyframe. In Properties, under Layer Transform, find Position. Set X to 260 so the rectangle sits on the left, then select the stopwatch beside Position. A diamond appears in the Timeline at the playhead: your first keyframe.
Move to a later time. Drag the playhead along the ruler to 03s.
Set the second keyframe. Set X to 1020, or drag the rectangle to the right in the viewer with the Selection tool (V). Because Position is animated now, the change adds a second keyframe at the playhead, and a dotted line in the viewer shows the path.
Play it. Press Space, or select Play Work Area in the Timeline. The rectangle glides from one keyframe to the other.
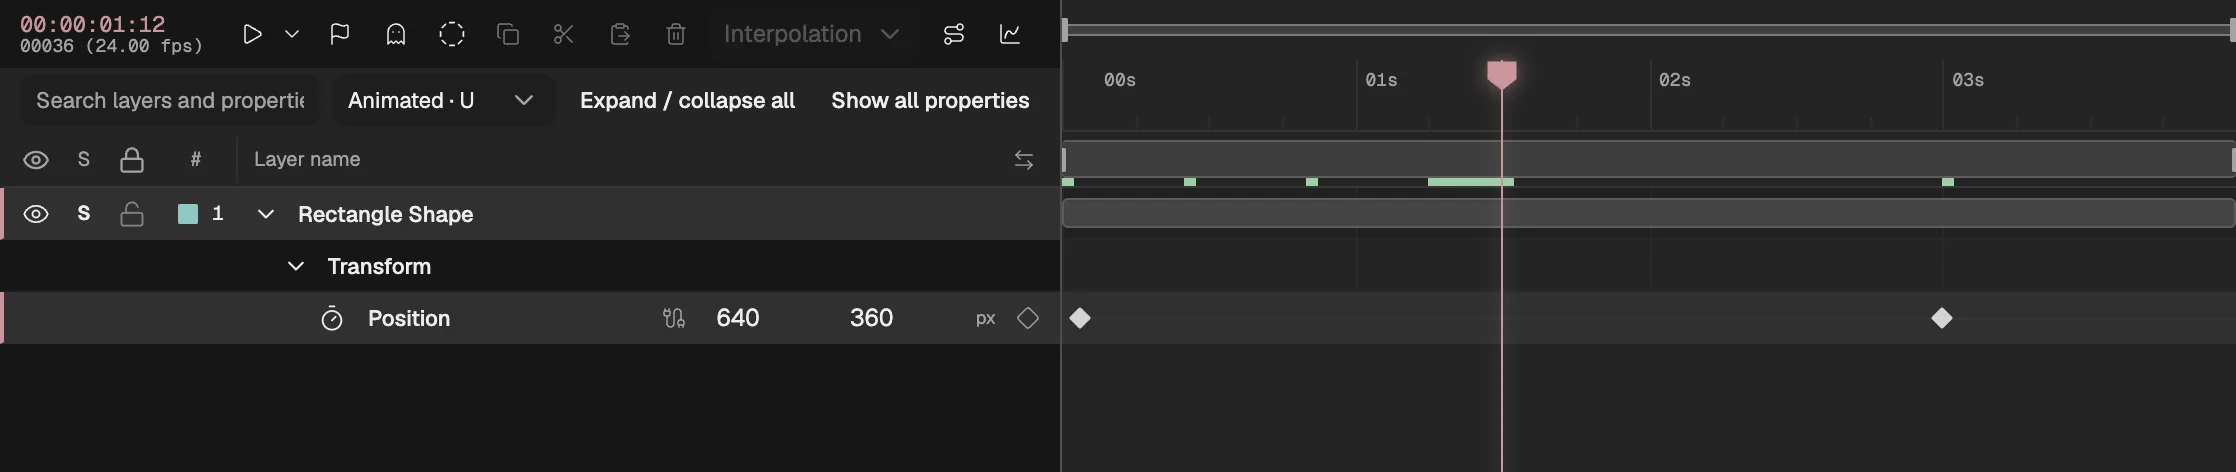
- The current time.
- The playhead: drag it to move through time.
- The stopwatch: while it is on, the property is animated.
- A keyframe: the value set at that moment.
Change your mind at any time. Drag a keyframe sideways in the Timeline to change when it happens, or put the playhead on it and change the value. ⌘Z (Ctrl Z on Windows) undoes the last change; redo and the rest are under History shortcuts (opens in a new tab).
With the layer selected, press U to see only its animated properties in the Timeline. The keys that show other properties are among the View shortcuts (opens in a new tab).
Where to go next
The documentation’s chapters, in reading order. In the editor, Keyboard shortcuts under Help lists every key, and this documentation is always under Help → Documentation.
- Getting started (opens in a new tab)What Keyframe is and what it needs, a first animation, and a tour of the editor.
- Projects and assets (opens in a new tab)Bring files into a project, organise them in the Project panel, and keep the project safe.
- Compositions (opens in a new tab)Compositions and pre-compositions, how they nest, and previewing your work.
- Layers and properties (opens in a new tab)Every kind of layer, and the properties that place, time and blend it.
- Animation (opens in a new tab)Keyframes and easing, the Graph Editor, motion blur, and rigging with bones and meshes.
- Text and shapes (opens in a new tab)Type and animate text, and draw shapes that can be animated point by point.
- Masks, mattes and keying (opens in a new tab)Show part of a layer with a mask, a track matte or a key.
- 3D (opens in a new tab)3D layers, cameras, lights and shadows, models and extruded text and shapes.
- Paint and tracking (opens in a new tab)Paint and Roto on a layer, and track or stabilise moving footage.
- Effects (opens in a new tab)Add and adjust effects, every effect the editor has, and effects you write as code.
- Expressions (opens in a new tab)Drive a property with a short script, and every name an expression can use.
- Agent (opens in a new tab)What the Agent does, how its drafts are reviewed, and the picture work it can do.
- Render and export (opens in a new tab)Render your animation to video, animated images or stills, alone or in a queue.
- Reference (opens in a new tab)Every keyboard shortcut, and what the Problems panel tells you.