Getting started
The workspace
The editor is laid out like After Effects: panels in docks around the Composition Viewer, the Timeline underneath and the tools along the top. Arrange it the way you work, keep layouts as workspaces, and reach any command from the keyboard.
Panels and docks
Three docks surround the Composition Viewer. The left one holds Project and Effect Controls as tabs. The bottom one holds the Timeline, Problems and History. The right one is a rail of icons beside a single open panel.
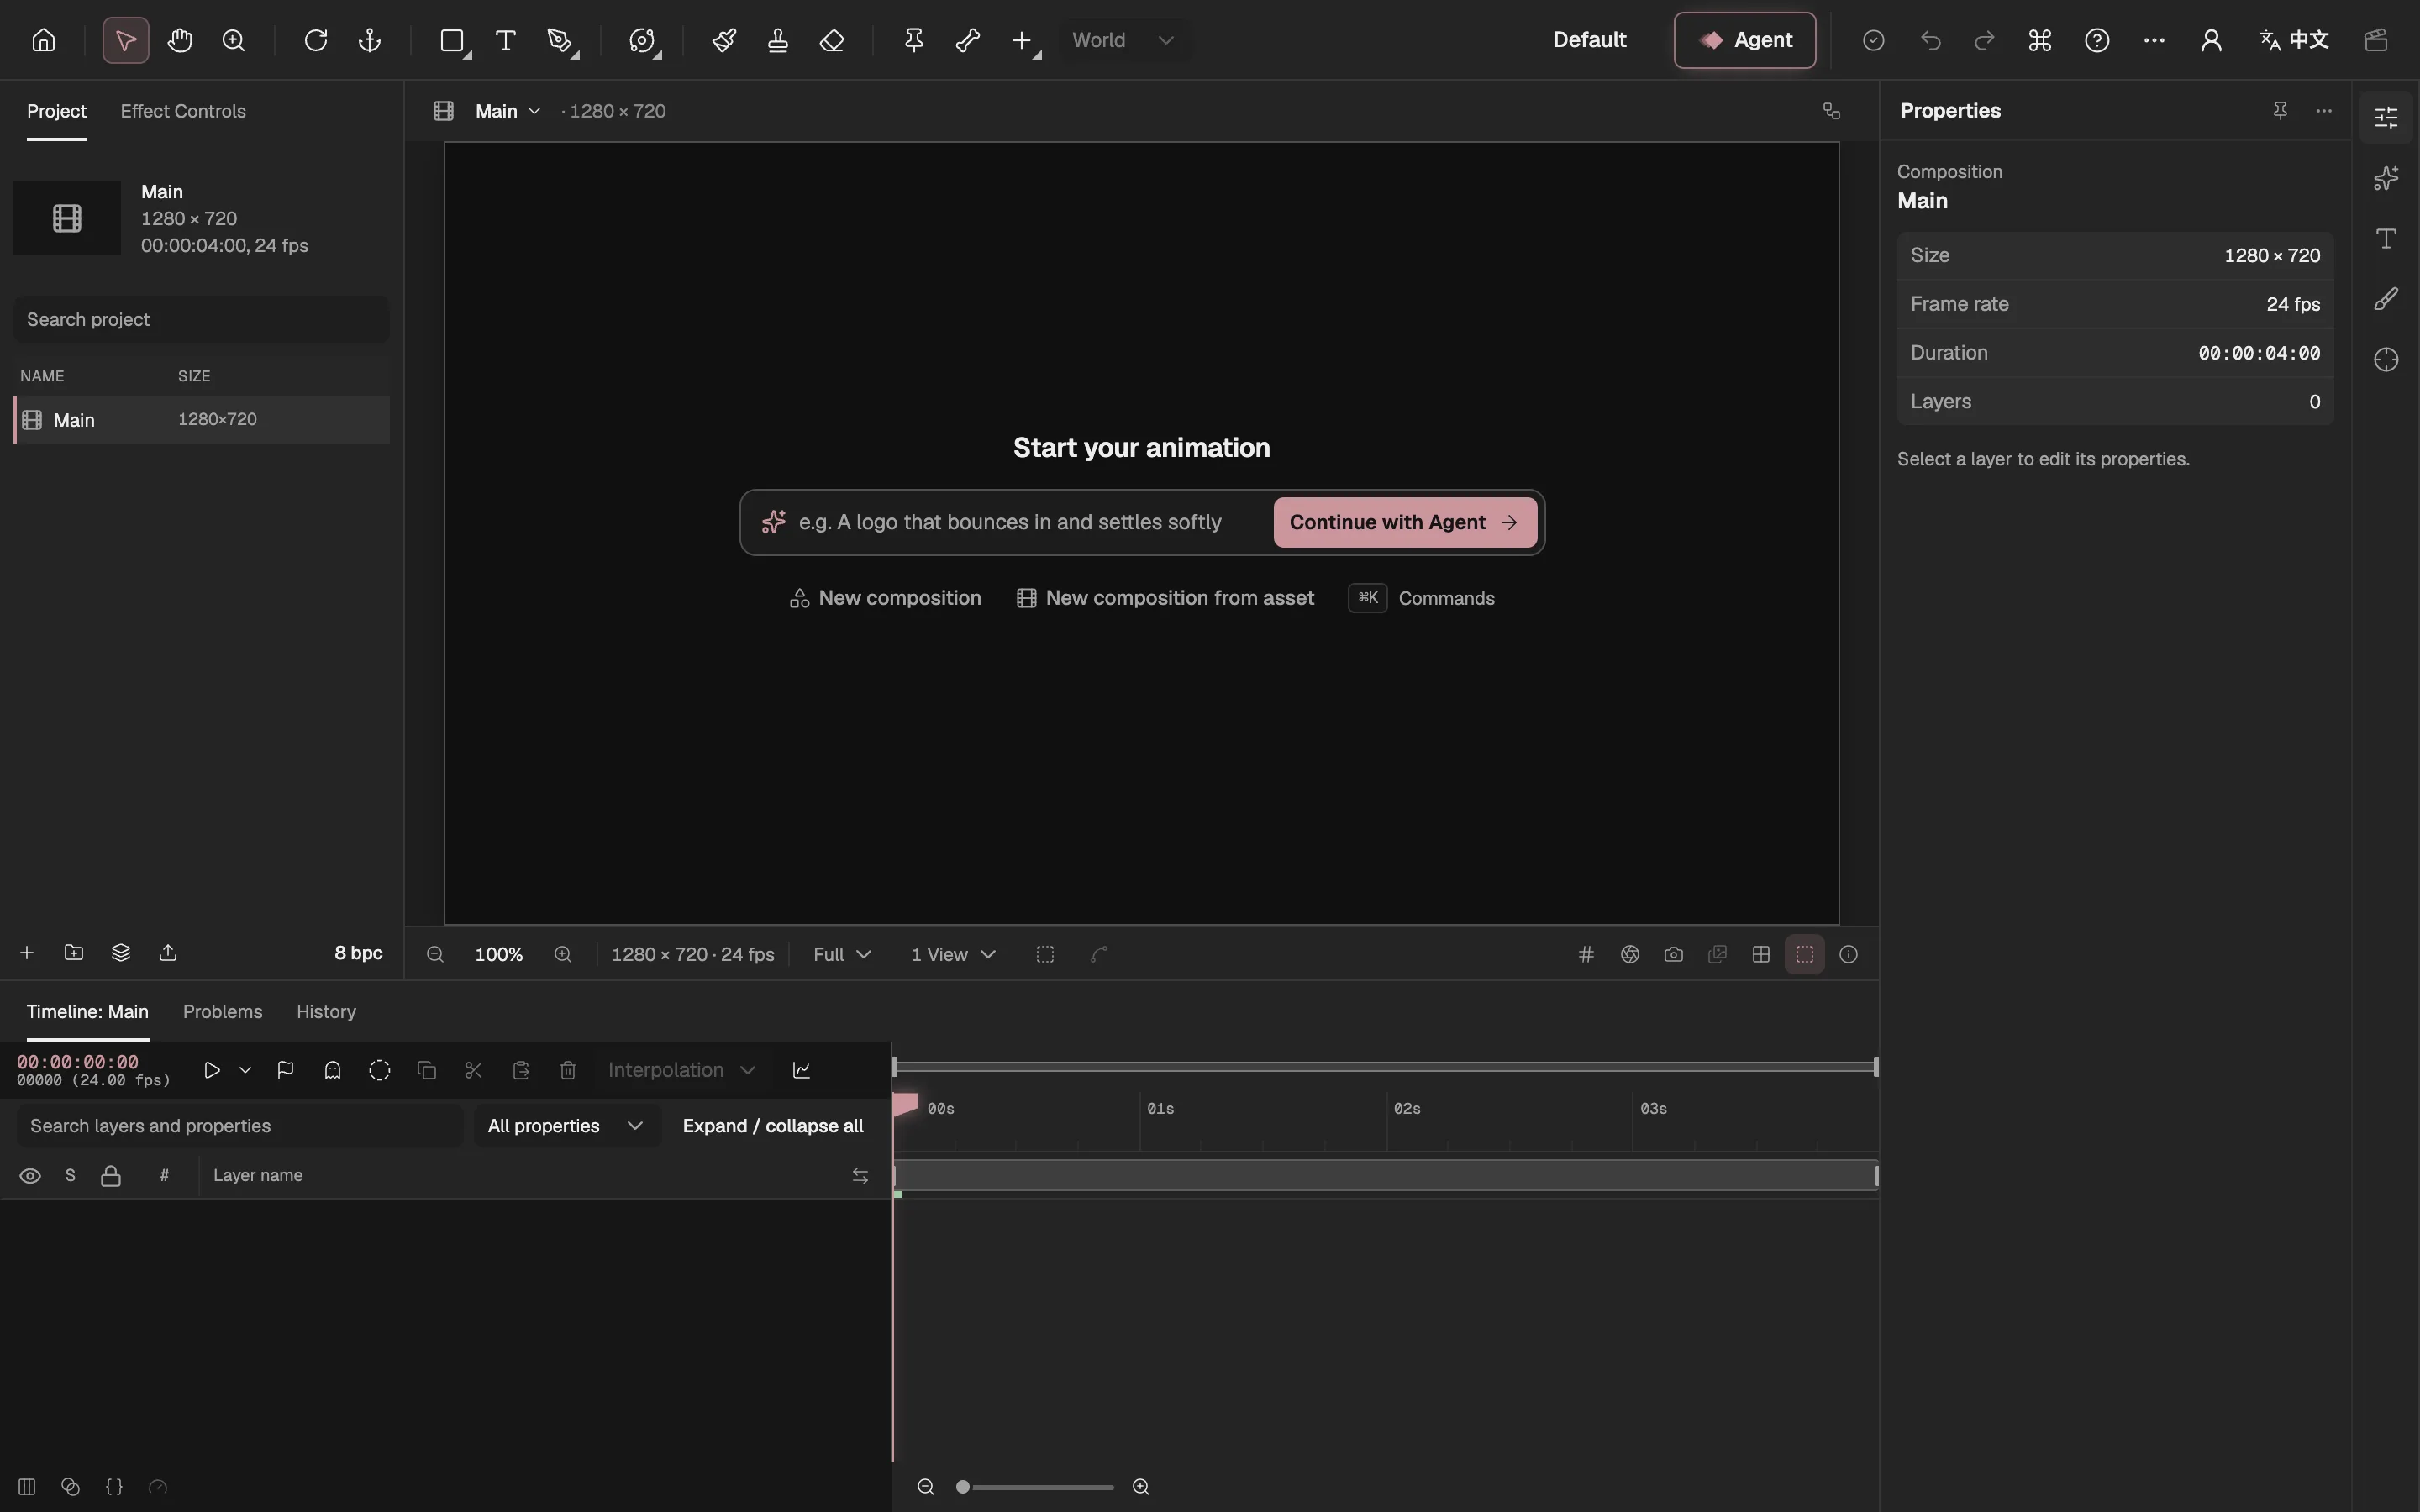
- The workspace menu: switch, save and reset layouts.
- The left dock’s tabs.
- The right rail: one panel at a time.
- The bottom dock’s tabs.
- The welcome panel of an empty composition.
- The Viewer’s aids.
- Opens the command palette.
- The right rail shows one panel at a time: Properties, Effects & Presets, Text, Paint and Tracking. Select an icon to open its panel. A dot on the Text icon means a text layer is selected; on Tracking, a video layer.
- Panels follow your tool. Picking up the brush, the eraser or the clone stamp opens Paint, and the Text tool opens Text; putting the tool down brings back the panel you had. To keep a panel in place, select Pin panel, the pin at the top of the rail’s panel.
- Pages inside a panel. Text, Paint and Tracking each hold two pages, shown as tabs at their top: Character and Paragraph, Paint and Brushes, Tracker and Content-Aware Fill.
- In a narrow window, the editor keeps the Viewer and the Timeline on screen, and Project, Properties and Agent open as sheets from their buttons.
Move and float panels
- Drag a tab or a rail icon onto another dock to move the panel there. It takes that dock’s form: a tab, or an icon on the rail.
- Drop it anywhere else to float it in a window of its own. Drag a floating panel by its title bar, resize it from its bottom-right corner, and dock it again from the button in its title bar.
- Or use a menu. Right-click a tab or a rail icon, or open the … menu at the top of the rail’s panel, and choose Move to left dock, Move to right dock, Move to bottom dock or Float panel.
- Resize the docks by dragging the borders between them.
Workspaces
A workspace is a layout: which panels sit in which dock, the floating ones, the open tabs and the sizes. The menu named after the current workspace, in the header, switches between them. These come built in:
- Default — every panel in its usual place, with Properties open on the right.
- Animation — a taller Timeline, with Effect Controls in front on the left.
- Text — Text open on the right.
- Paint — Paint open on the right.
- Tracking — Tracking open on the right, with Effect Controls in front on the left.
Whatever you rearrange is kept in the current workspace. Reset current workspace puts it back as it was built; Save as new workspace keeps the current layout under a name of your own, and Rename workspace and Delete current workspace act on the current one.
Workspaces belong to this browser, not to a project: a project file doesn’t carry them, and they never change your animation.
Viewer aids
The buttons at the right of the bar under the Composition Viewer help you see and place things. They change only what the Viewer shows, never what you export, and what they show is remembered in this browser.
- Grid and guide options (the # button) shows Title/Action Safe margins, a Proportional Grid or an even Grid, the composition’s Guides, and Rulers along the top and left in composition pixels.
- Guides. With the rulers showing, drag from the top ruler for a horizontal guide or from the left one for a vertical guide. Drag a guide to move it, or drag it off the picture to remove it. Guides are saved with the composition, and adding, moving or removing one is a step you can undo.
- Snapping, in the same menu, pulls a layer you drag to the edges and centres of other layers and of the composition, to guides and to the grid. Hold ⌘ (Ctrl on Windows) while dragging to switch it the other way for that drag.
- Show Channel shows the red, green or blue channel, or the alpha (external website, opens in a new tab), as grey.
- Take Snapshot keeps the Viewer’s current picture; hold down Show Snapshot to see it over the Viewer and compare. A snapshot lasts until you leave the editor.
- Info shows, in the Viewer’s corner, the composition pixel under the pointer, its colour and the selected layer.
- Show transparency grid shows see-through areas as a checkerboard, and Show layer controls turns the selection outline, handles and motion paths on and off.
More Composition Viewers
To keep an eye on a second composition, or on the whole picture while you work up close, tick Composition Viewer 2 or Composition Viewer 3 under Viewers in the workspace menu, or choose New Composition Viewer in the command palette. It opens as a floating panel, which you can dock like any other; untick it in the menu to close it.
An extra viewer shows the active composition at the current time. Select its lock (Lock this viewer), or choose a composition from its list, to keep it on one composition whichever is active. Extra viewers only show: you select and edit in the main Viewer.
History
History, a tab in the bottom dock, lists the project’s undo steps, oldest first. Select a step to go back to just after it, or Original to go back to before the first. The steps after it dim; make a new change and they are dropped, as with undo. Steps the Agent made are marked with a small robot.
The history is saved with the project. How many steps it keeps is set under Undo levels in the project settings (opens in a new tab).
An empty composition
While a composition has no layers, the Viewer shows a small welcome panel: its title, Start your animation, a box to describe the animation you want, and a row of actions.
- Describe it and select Continue with Agent. The Agent panel opens with your words in its message box. Nothing runs until you check them and send.
- New composition sets up this empty composition: its name, size, frame rate, duration and background.
- New composition from asset takes one picture or video: the composition takes its size, and it becomes the first layer.
- ⌘K Commands is a reminder of the command palette.
The panel fades when you press on the canvas, steps aside while a tool that creates on a click is active, such as Text, Shape or Pen, and goes once the composition has its first layer.
Command palette
Press ⌘K (Ctrl K on Windows), or select the ⌘ button in the header, to open the Command palette. Type a few letters of what you want and press Enter to run the best match, or pick another with the arrow keys.
It lists the editor’s commands with their keys (undo and redo, playback, view, tools and more), a new composition, panels such as Problems and a new Composition Viewer, the Viewer’s view switches, and every effect that fits the selected layer, which it adds at once.
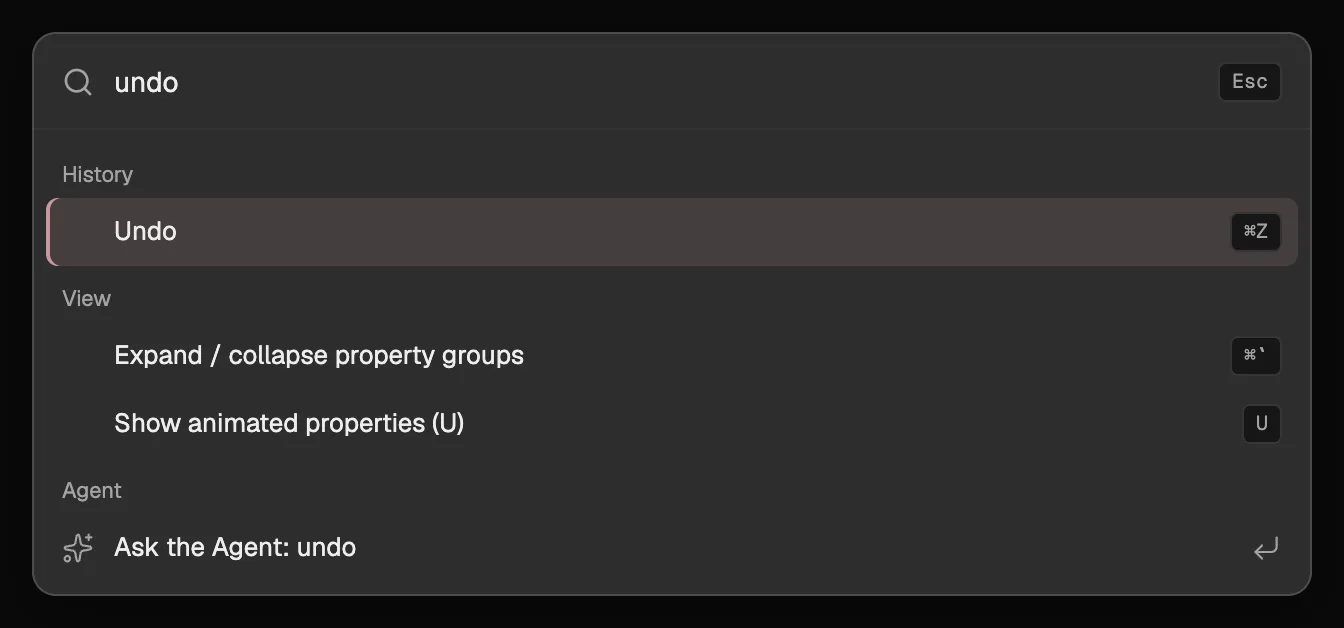
- What you type narrows the list.
- Commands come in groups.
- A command’s keyboard shortcut.
- Hands what you typed to the Agent.
Hand a task to the Agent. Whatever you type also appears last, as Ask the Agent: …. Choose it and the Agent panel opens with your words, ready for you to check and send.
Every key is listed in Keyboard shortcuts (opens in a new tab), and in the editor under Help → Keyboard shortcuts.