Paint and tracking
Tracking and stabilizing
Tracking follows something through a video: a point, a flat surface, a mask or a face. Apply what it finds to move another layer with it, hold a shaky shot still, fill in what a mask takes out, or match a 3D camera to the shot. All of it is worked out in your browser.
Track a point
Tracking works on video layers. Select one and open the Tracking panel on the right rail (a dot on its icon means a video layer is selected), or switch to the Tracking workspace. Its Tracker page is the Tracker panel.
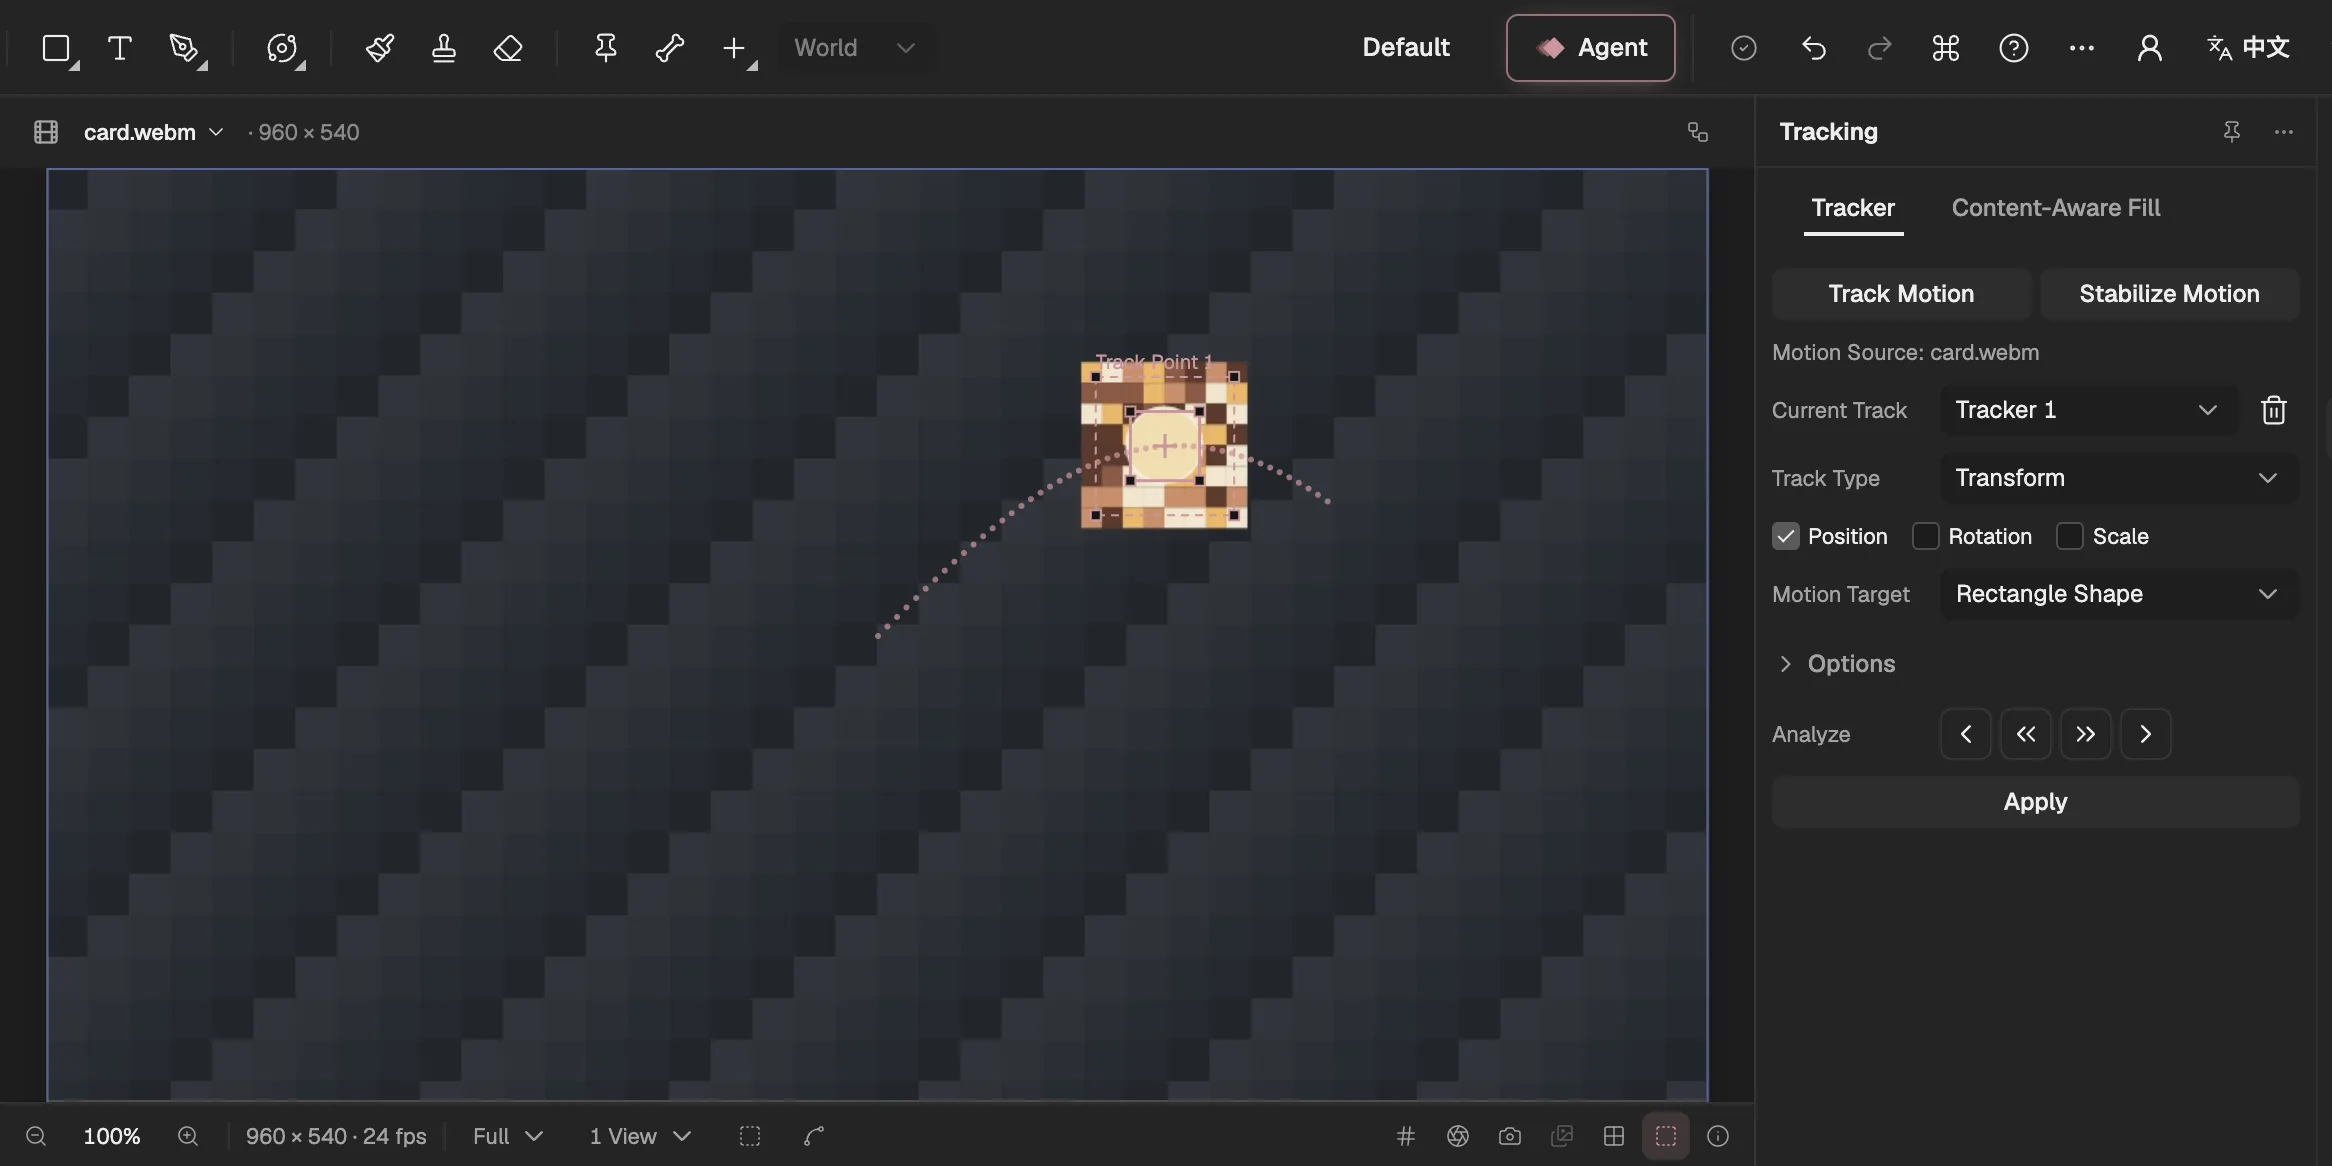
Select Track Motion. A tracker named Tracker 1 is added to the layer, with one track point in the middle of the picture. Stabilize Motion adds one that holds the layer itself still instead.
Place the track point. Go to the frame to start from. In the Viewer, with the Selection tool, drag the inner box, the feature region, over something distinct that stays in view; the whole point moves with it. The outer dashed box is the search region, where the next frame is looked for: drag its corners to grow it for fast motion. The + is the attach point, the place that gets applied; drag it on its own to set it away from the feature.
Analyze. The four buttons after Analyze track one frame back, back to the layer’s start, forward to its end, or one frame forward. Each frame shows as it is found, and the point’s path is drawn as dots. To stop, select Stop analysis, the square that shows while it runs; the frames already tracked are kept.
Apply it. Choose a Motion Target and select Apply, as described below.
- Adds a tracker to the selected video layer.
- What the tracker follows and how it is applied.
- Track one frame, or to the end, backward or forward.
- The layer the track moves.
- Writes the track as keyframes on the target.
- The track point and its path: the feature region, the search region and the attach point.
Trackers are saved with the layer, and a layer can hold several: pick one under Current Track, or remove it with Delete tracker, the bin beside it. Every change to a tracker is a step you can undo.
Track types and options
Track Type decides how many track points the tracker has and what Apply does with them:
- Transform — follows one point and moves the target with it. Tick Rotation or Scale as well and a second point is added: the turn and the change in distance between the two drive the target’s rotation and scale.
- Stabilize — the same points, applied the other way round: the tracked layer moves against the motion, so the feature stays put.
- Parallel corner pin — three points on a flat surface seen straight on; the fourth corner is worked out to complete the parallelogram.
- Perspective corner pin — four points, one on each corner of a surface seen in perspective.
- Planar — the four corners of a flat surface, such as a screen or a sign. The whole area inside them is followed, not four separate features; it is drawn as an outline, and you drag its corners.
- Raw — only records the motion, as keyframes on its track points. It has no target and cannot be applied.
Options set how each frame is matched. Channel compares colour, brightness or saturation: choose the one in which the feature stands out most (planar tracks always compare brightness). Adapt feature on every frame takes the feature afresh on each frame, for something that slowly changes. When a match’s confidence falls below the percentage you set, the tracker can Continue tracking, Stop tracking, Extrapolate motion or Adapt feature.
Apply a track
Motion Target lists the composition’s other 2D layers. For Transform it also lists the point parameters of their effects, such as the centre of a Lens Flare (opens in a new tab), so an effect can follow the feature. Stabilize always applies to the tracked layer itself.
Apply writes one keyframe for each tracked frame, replacing the keyframes in that stretch, in one step you can undo:
- Transform: the target’s Position follows the attach point, also when the target has a parent; with two points, its Rotation and Scale follow too.
- Stabilize: the tracked layer’s Anchor Point is put on the attach point on every frame, with the opposite rotation and scale.
- Corner pins and Planar: the target’s Corner Pin (opens in a new tab) effect, added if the layer has none, pins the layer’s four corners to the track.
- An effect’s point: follows the first track point.
Apply becomes available once at least two frames are tracked and a target is chosen. A locked target has to be unlocked first.
Track a mask or a face
Draw a mask on the video layer and the Tracker panel gets a Mask Tracker section. Choose the Mask and a Method, go to a frame where the mask fits, and use the buttons after Track Mask, in the same four directions as Analyze. The mask’s path gets a keyframe on each frame.
- Position to Perspective follow what is inside the mask as one area, and let the mask move, scale, turn, skew or change in perspective, as far as the method you chose allows.
- Face Tracking (Outline Only) finds the face inside the mask and follows it; the mask becomes the outline of the face. A frame where no face is found gets no keyframe.
- Face Tracking (Detailed Features) does the same, and adds a Face Track Points (opens in a new tab) effect whose points follow the eyes, brows, nose, mouth and chin, for expressions to follow.
Face tracking uses a face model that comes with the editor and runs in your browser. On the frame you start from, the face’s nose must be inside the mask.
Warp Stabilizer
To steady a whole shaky shot, add Warp Stabilizer (opens in a new tab) from Effects & Presets to the video layer. It changes nothing until it has analysed the footage: in Effect Controls, select Analyze in the line at the top of the effect. When it is done, the line says how many frames were analysed.
Then choose what it does: smooth the camera’s motion or take it out altogether, how strongly, whether it corrects position, scale and rotation or perspective too, and how the moving edges are cropped and the picture scaled up to hide them. If the footage is replaced, the line says the analysis is for other footage: analyze again.
Content-Aware Fill
Content-Aware Fill takes something out of a video: you mask it out, and the editor fills the hole on every frame from what the rest of the shot shows. It is the second page of the Tracking panel, Content-Aware Fill.
Mask out what should go. On a 2D video layer, draw a mask round it, set the mask’s mode to Subtract, and animate or track the mask so it covers the object on every frame.
Choose how to fill. Alpha Expansion grows the hole by a few pixels to take in edges and shadows. Under Fill Method, Object takes what other frames show behind the object, lined up with the background’s motion, and makes up what no frame shows from the picture around it; Surface does the same but blends what no frame shows smoothly in from the edge, for plain surfaces; Edge Blend blends each frame in from the edge on its own, which is quickest. Range is the Work Area or the Entire Duration.
Select Generate Fill Layer. Progress shows frame by frame, and you can stop it. The fill becomes new footage in the project and a layer just above the original, parented to it, in one step you can undo.
If the range is too long for the footage to be held in memory, the panel says so: fill a shorter range.
Track the camera
The 3D Camera Tracker (opens in a new tab) works out how the camera that filmed a shot moved, so that 3D layers can sit in the scene. Add it from Effects & Presets to the video layer.
Analyze. In Effect Controls, select Analyze. Features are tracked across the shot, then the camera is solved; when it is done, the line says how many frames were solved and the average error in pixels. The shot needs camera movement and detail to follow; if it has too little, the solve fails and says so.
Pick track points. The solved points show in the Viewer. With the Selection tool, click one, and Shift-click to add more; a target is drawn where they lie.
Create layers. Create Camera adds a camera that moves as the real one did. Create Solid and Camera, Create Null and Camera and Create Text and Camera also add a 3D layer on the target, and the camera if there is none yet. With three or more points selected, Set Ground Plane and Origin makes them the scene’s ground and origin.
The footage layer must be 2D, unrotated and centred in the composition, because the camera is lined up with it there; otherwise the editor asks you to place it so before it creates anything. Cameras and 3D layers are covered in 3D layers, cameras and lights (opens in a new tab).
Good to know
- All tracking reads the video’s own frames, before the layer’s transform, masks and effects, and runs in your browser; nothing is uploaded.
- Only video layers can be tracked, stabilized or filled; a still image can’t.
- The Agent can run the same analyses when you ask it to, and shows what it found as a draft for you to review.
- Not there yet, compared with After Effects: Mocha; lens distortion, rolling shutter and the detailed analysis in the camera solve; Warp Stabilizer’s Subspace Warp; and lighting correction and reference frames in Content-Aware Fill.