Paint and tracking
Paint and Roto
Paint straight onto a layer with a brush, an eraser or a clone stamp, stroke by stroke and frame by frame, and cut a subject out of a picture or a video with Roto Brush. Every stroke and every guide stays editable, and nothing leaves your browser.
Paint on a layer
The paint tools sit in the toolbar: Brush tool (B), Clone Stamp tool (C) and Eraser tool (E). They paint on the selected layer, straight in the Composition Viewer, if it is an unlocked 2D image, video, text, shape, solid or pre-comp layer and the current time is inside it.
Select the layer and go to the frame where the stroke should start.
Pick up the Brush tool. The Paint panel opens on the right rail, and a row of options appears above the Viewer: Color, Diameter, Opacity, Duration and Brush tip.
Drag on the picture. Each drag is one stroke, added to the layer as a step you can undo. With a pen, pressure can change the stroke’s size or opacity.
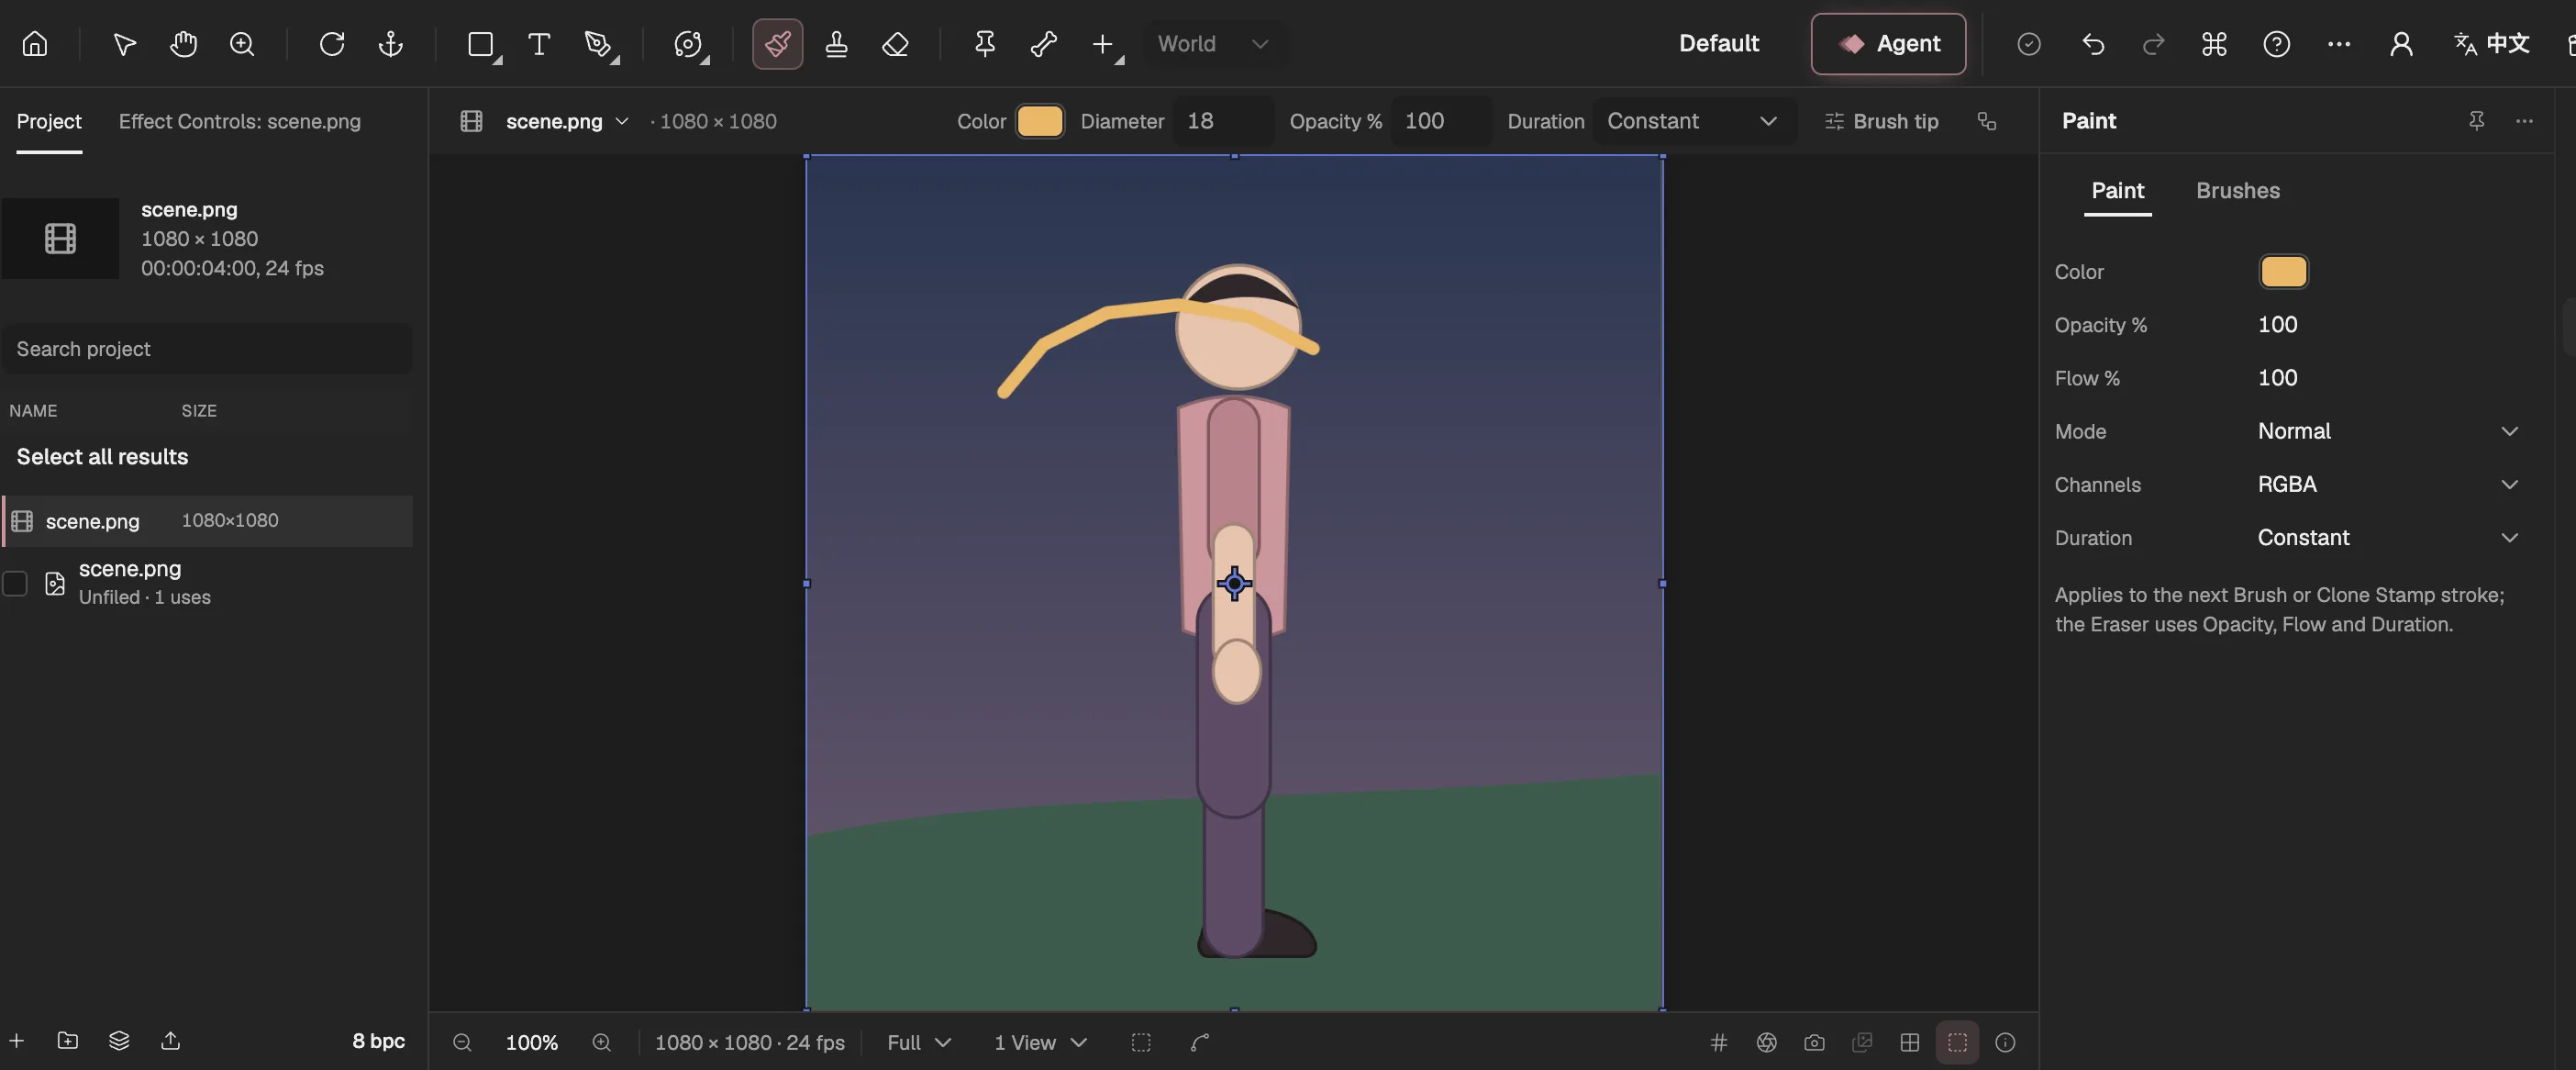
- The Brush tool.
- The brush’s options, above the Viewer.
- A painted stroke.
- Colour, Opacity and Flow of the next stroke.
- How the stroke blends, and into which channels.
- How long the stroke stays on screen.
Putting the tool down brings back the panel you had before. To keep the Paint panel open whatever tool you hold, select Pin panel at the top of the panel, or switch to the Paint workspace.
The Paint panel
The Paint panel sets how the next Brush or Clone Stamp stroke is applied; the Eraser uses its Opacity, Flow and Duration. The settings last until you reload the editor, and each stroke keeps the ones it was painted with.
- Color — the brush’s colour.
- Opacity — the most a stroke covers, however often you go over a spot.
- Flow — how much each dab of the brush puts down; lower it to build colour up gradually.
- Mode — how the stroke blends with the layer under it, with the layer blend modes.
- Channels — RGBA paints colour and opacity, RGB only colour, and Alpha only opacity, taken from the brightness of the colour.
- Duration — how long the stroke stays on screen, below.
Stroke duration
A stroke begins on the frame you paint it on. Duration says how long it lasts:
- Constant — from that frame to the end of the layer.
- Write On — as long, but the stroke draws itself on, taking as long as you took to paint it.
- Single Frame — that frame only, for animating frame by frame.
- Custom — the number of Frames you set.
Brush tips
Brushes, the second page of the Paint panel, lists hard and soft round tips in several sizes. Under the list, set the tip’s Diameter, Angle, Roundness, Hardness and Spacing, and tick under Pen pressure controls whether a pen’s pressure changes its size, its opacity or both.
To keep a tip, type a name and select Save Brush Tip. Saved tips belong to this browser, not to a project, and are listed after the built-in ones.
Eraser and Clone Stamp
The Eraser tool takes opacity away from the layer, both its own picture and the paint on it, with the brush tip, Opacity, Flow and Duration you set. Its strokes are strokes like any other: you can retime or remove them later.
The Clone Stamp tool paints with a copy of another part of the picture. Option-click (Alt-click on Windows) to set where to copy from: the top layer under the pointer, on the current frame. Then paint; each stroke starts copying from the spot you sampled. The source must be in the same composition, and it is forgotten when you leave the editor.
Change strokes afterwards
The first stroke on a layer adds a Paint effect to it, which holds all its strokes; it goes again when the last stroke does. The strokes are listed under Layer in Properties and as rows under the layer in the Timeline.
In Properties, select a stroke to change its start and end frames, move it up or down the stack, or remove it; Stroke Options holds the settings it was painted with, from its size and opacity to its colour, mode, channels and Write On frames. In the Timeline, select a stroke’s row and press Delete to remove it. Each change is a step you can undo.
Cut out a subject with Roto Brush
The Roto Brush tool (R) separates a subject from its background, as in rotoscoping (external website, opens in a new tab): you paint rough guides, and the editor works out the matte. It works on an unlocked 2D image or video layer.
Mark the subject. With the layer selected, pick up the Roto Brush tool; it starts as Foreground guide. Paint a line or two inside the subject.
Mark what is not the subject. Hold the tool’s button, or right-click it, and choose Background guide. Paint round the subject, wherever its edge might be mistaken.
Select Generate matte in the bar at the bottom left of the Viewer. The matte is worked out in your browser. Compare Before, After, the Matte itself and an Overlay; add guides where it went wrong and select Regenerate.
For a video, spread it over time. Set Source start and End (exclusive), a range of frames round the one with the guides, and select Propagate. Each frame shows how sure the editor is of it; where it is unsure or something passes in front, add guides on that frame and propagate again.
Select Freeze matte. Only frozen frames cut the layer out in the preview and the export; guides alone change nothing. Freezing is a step you can undo.
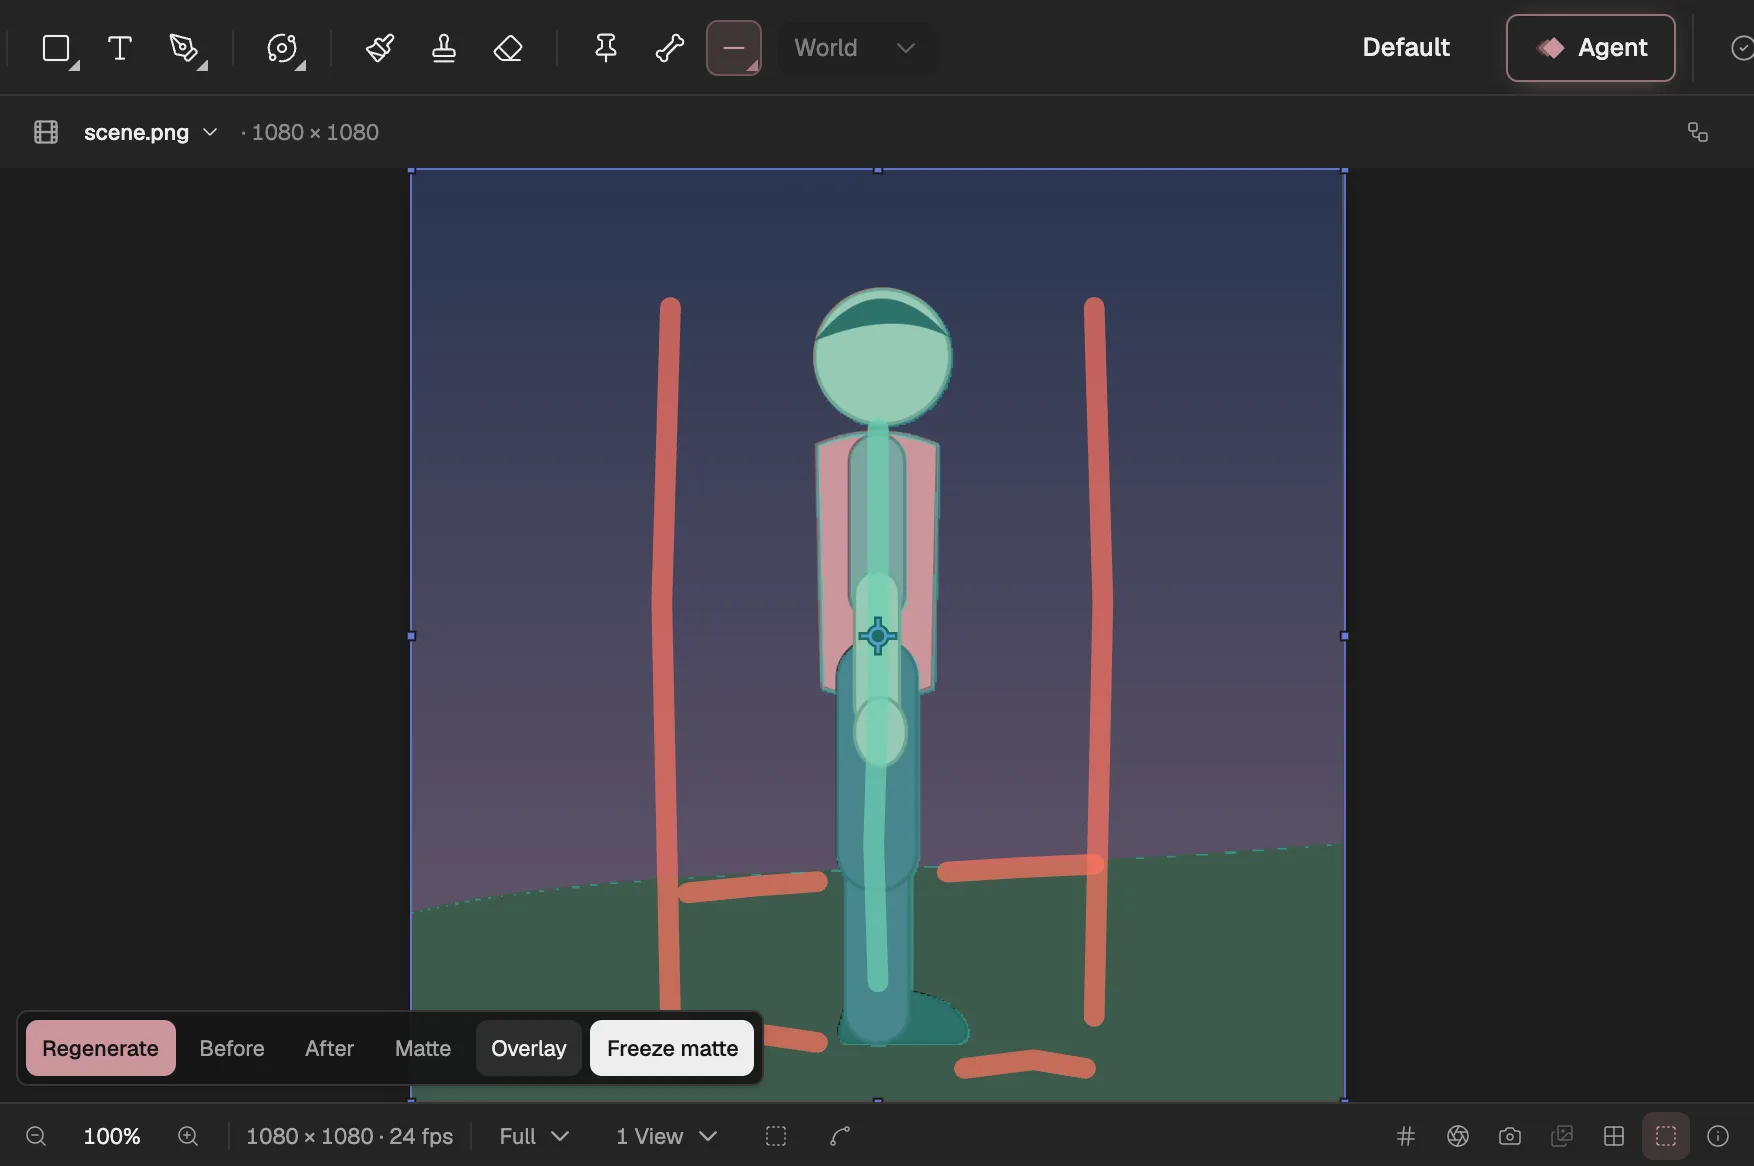
- Roto Brush: foreground, background or refine edge.
- A foreground guide, inside the subject.
- A background guide, outside it.
- Works the matte out again from the guides.
- Compare before and after, the matte or an overlay.
- Keeps the matte, so it cuts the layer out.
Guides belong to the frame of the source they were painted on. They are kept in a Roto Brush effect, first on the layer, and listed under Layer in Properties, where you can remove them one by one.
Refine the edge
The Roto Brush effect, in Effect Controls, shapes the frozen matte: Feather softens it, Expansion grows or shrinks it, and Refine Edge rebuilds a soft edge for hair and fur, as wide as Edge Radius, smoothed by Smooth, with Decontaminate Edge Colors taking the background’s colour out of it.
To widen that soft edge in places only, choose Refine Edge from the Roto Brush tool and paint along the edge there; it counts once Refine Edge is on.
A matte made another way, such as with a keying effect (opens in a new tab), can be refined with Refine Soft Matte (opens in a new tab).
Good to know
- Painting and Roto happen in the Composition Viewer itself; there is no separate Layer panel.
- The Agent can freeze a Roto matte from the guides you painted: it shows the frames it will cover, and nothing happens until you select Freeze matte.
- To take an object out of a video and fill in the background behind it, see Content-Aware Fill (opens in a new tab).